Thursday, August 30, 2012

Fiesta Tortilla Stack

This dish is a family favorite.  In fact, when my oldest son was leaving on a two-week trip to England to study at Oxford, I asked him what he would like for his last California meal and he requested this. Shortly before I was to begin preparing dinner, I found out my parents would be joining us, so all of the pictures depict me doubling the recipe.


I found this recipe in a Pampered Chef product catalog years ago.  One of the ingredients is the Pampered Chef Southwestern Seasoning Mix, which I always use.  I'm not familiar with any other Southwestern seasoning mixes in order to recommend one if you aren't able to order the mix from Pampered Chef.  I'm sure other brands would give a similar result.  This dish gets 9s across the board on the Melnarik rating scale.


There is quite a bit of chopping required in preparing this dish, but it's definitely worth the time.  In a medium bowl, I combine the chopped chicken, red bell pepper, green onions, and cilantro.


It smells so fresh and the colors are beautiful.  This gets set aside temporarily.


In a small bowl, I combine the bean dip, Southwestern Seasoning Mix, and sour cream.  This mixture also gets set aside.


This doesn't look very appetizing, but it's a key ingredient.  After this I shred the cheddar cheese.  I always use sharp cheddar, as I feel the flavor of the cheese doesn't get lost with the other flavors.


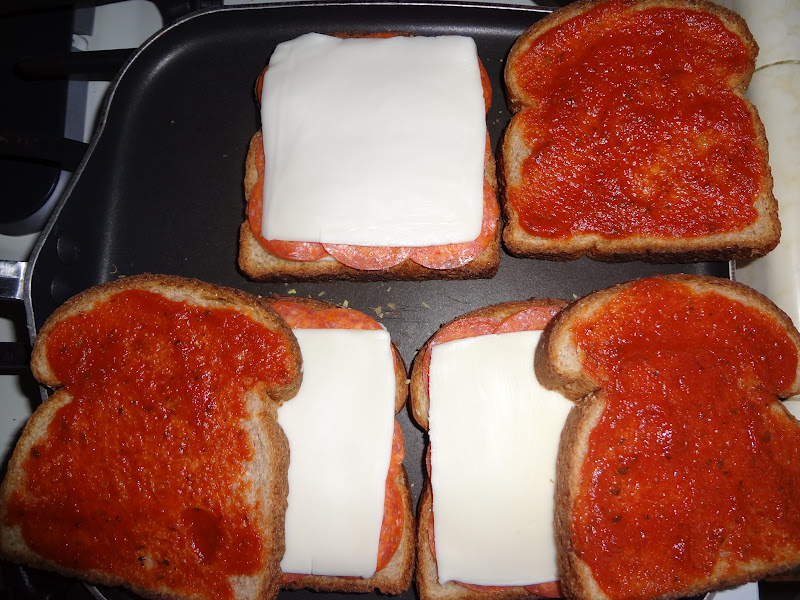
When making this dish for my family alone, I usually use the burrito size tortillas and assemble and bake it on my Pampered Chef Baking Stone, but with my parents joining us, I used the soft taco size tortillas and put them on my non-stick baking sheet.  Next, the layering begins with the plain tortillas.


I spread the bean dip mixture on the tortillas, spreading it almost to the edge.


Then I add the chicken mixture.  I've found that if I put a small heap in the center of the tortilla and use my hand to gently "spread" it toward the edge of the tortilla, that works best.  This method is especially helpful when I get to the 3rd and 4th layers.  The chicken mixture somewhat sticks to the bean dip layer.


The next layer is the cheddar cheese.  We like cheese in our house, so I'm quite generous with the amount I add. 


Then I begin repeating the layers.  I've found that spreading the bean dip on the tortilla before putting it on top of the cheese layer helps me spread it more evenly.


Another layer of the chicken mixture goes on next, 


followed by another layer of cheese.


I won't bore you with pictures of the next two layers, which are identical to the first two layers.  I add the last of the bean dip mixture to the final tortilla (stack on left side) and sprinkle a lesser amount of cheese on top of that (stack on right side).


As you can see, the stack is pretty tall at this point.  As it cooks and the cheese melts, it will lose some of that height.  Into the oven it goes  for 35 minutes at 375°F.


When it comes out of the oven, it smells delicious and the cheese has melted into the bean dip (this layer helps keep the top tortilla from getting over browned and crispy.


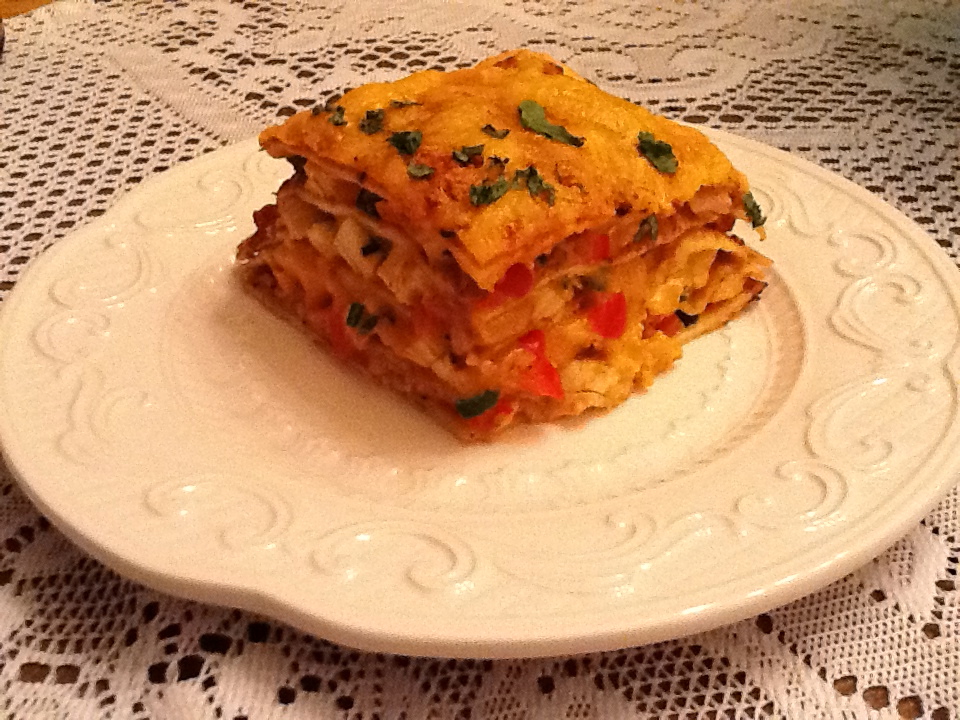
I add a little more fresh cilantro for color and flavor and it's ready to slice into wedges and serve.


Not only was Jimmy pleased he had picked this meal for dinner, but my parents loved it also.  Several days later I was talking to my mom on the phone and in the background my dad was telling her to ask me for the recipe.  I told her to tell him that I'd post it to my blog, so everyone would have the opportunity to make and eat this tasty treat.  By the way, this dish requires both a knife and fork to eat!  Enjoy!


Fiesta Tortilla Stack

2 cups cooked chicken breasts, chopped
1 medium red bell pepper, chopped (1 cup)
½ cup thinly sliced green onions
¼ cup snipped fresh cilantro
1 can (9 oz.) bean dip
2 tablespoons sour cream
1 tablespoons Southwest Seasoning Mix*
5 (10-inch) flour tortillas
3 cups shredded sharp cheddar cheese

In a medium bowl, combine chicken, red bell pepper, green onions, and cilantro; mix gently.  In a small bowl, combine bean dip, sour cream, and seasoning mix.  Preheat oven to 375°F.  Place one tortilla on a baking stone or baking sheet.  Top with a thin layer of bean dip mixture, spreading almost to the edge.  Top with ¼ of the chicken mixture.  Top with approximately 1 ½ cups of cheese.  Repeat layers 3 more times.  Top with remaining tortilla spread with the remainder of the bean dip mixture.  Sprinkle with remaining cheese.  Bake at 375°F for 35 minutes or until cheese is completely melted.


*I use Pampered Chef brand Southwest Seasoning Mix

Wednesday, August 29, 2012

Turkey Club Sandwich with Avocado Aioli

I tried this recipe for the first time recently and think it has become one of the favorites of my family.  One reason is the bread, which is embellished with parmesan cheese and oregano.  Another reason is the marinated vegetables, which give this sandwich a fresh taste.  Then, of course, the addition of bacon makes everything better, according to my guys!


I found this recipe in a Pillsbury Bake-Off recipe magazine, which indicated that Helather Halonie of Webster, WI was the person who submitted this recipe.  This sandwich received 9's from everyone on the Melnarik rating scale.


I began by opening a tube of Pillsbury refrigerated Crusty French Loaf and putting it on my baking sheet seam side down.  Mine has a wonderful non-stick surface, so I didn't need to use any cooking spray, if yours does not have a non-stick surface, you'll want to cover it with baking parchment paper or use a no-stick cooking spray where the bread will sit.


With a sharp knife, I cut five diagonal lines into the dough, piercing the top about 1/4 inch.


In a small bowl, I combined the Parmesan cheese and oregano.


After spraying the top of the dough with a mist of oil (no-stick cooking spray or butter may be used here), I sprinkled the cheese mixture as evenly as possible.  Into the oven the bread went to bake at 350°F  for about 30 minutes.


In the meantime, I began cooking my bacon (sorry no photo) until crisp.  Also, in a medium bowl, I combined the shredded lettuce, onion, tomatoes, oil, vinegar, red pepper flakes and oregano.  Instead of shredding my own lettuce, I bought the pre-shredded lettuce that is found in the produce section of the market near the other bagged lettuces.  This mixture then went into the refrigerator  for 20 minutes to let the flavors blend and to slightly wilt the lettuce.


The kitchen was smelling great at this point.  When the bread was finished, I brought it out of the oven and left it to cool completely.


In a mini food processor, I combined the mayonnaise, garlic and avocado.


I processed this mixture until smooth, scraping the sides once.


When the bread was completely cool, I sliced it lengthwise and pressed down the bread on the bottom half to flatten it so it would hold the vegetable mixture.  Then I spread the avocado aioli on each half.


On the bottom half, I piled the marinated vegetables that I had put in the refrigerator earlier.


Then I added the thinly sliced deli-style turkey.


I then added sliced provolone cheese.


The next layer was the crisp bacon.


I placed the top half of the bread over the bacon and it was ready to slice and serve.


Just looking at this picture is making my mouth water!  There is another sandwich I make where the bread is "dressed" similarly and my oldest son refers to it as the "Jesus Sandwich."  It used to be his favorite sandwich.  When he tasted this one, he declared this one just a little bit better and called this one "The Holy Spirit Sandwich."  When I asked him why, he said it was because it spoke to him!  Enjoy!

Turkey Club Sandwich with Acocado Aioli

1 can (11 oz.) Pillsbury refrigerated Crusty French Loaf
1 tablespoon fresh grated Parmesan cheese
2 teaspoons dried oregano leaves, divided
1 ½ cups shredded lettuce
¼ cup chopped red onion
2 medium plum (Roma) tomatoes, chopped
¼ cup extra virgin olive oil
1 ½ tablespoons red wine vinegar
½ teaspoon crushed red pepper flakes
1/3 cup mayonnaise
2 cloves garlic, finely chopped
½ avocado, pitted, peeled and roughly chopped
8 oz. thinly sliced cooked turkey from deli
5 slices provolone cheese
8 slices bacon, halved, crisply cooked

Heat oven to 350°F.  Spray large cookie sheet with no-stick cooking spray or line with cooking parchment paper.  Place loaf of dough, seam side down, on cookie sheet.  Using a sharp or serrated knife, cut 5 diagonal slashes about ¼ inch deep on top of dough.  In a small bowl, combine the Parmesan cheese and 1 teaspoon of oregano.  Spray top of loaf with no-stick cooking spray or oil; sprinkle with cheese/oregano mixture.  Bake 26 to 30 minutes or until deep golden brown.  Cool completely on cookie sheet – about 20 minutes.  Meanwhile, in a medium bowl, mix lettuce, onion, tomatoes, oil, vinegar, red pepper flakes and remaining 1 teaspoon oregano.  Refrigerate about 20 minutes to blend flavors and slightly wilt lettuce.  In a food processor, cover and process mayonnaise, garlic and avocado until smooth.  Cut bread in half horizontally.  Press inside of bottom half of bread to flatten slightly for filling; spread both bottom and top with avocado aioli.  Place lettuce mixture in bottom half.  Top with turkey, provolone cheese and bacon.  Place top of loaf over bacon; cut and serve.

Wednesday, August 22, 2012

Pizza Grilled Cheese

One evening I needed to throw together dinner really fast so I turned to this recipe I found on Pinterest.    It originated at thewaytoaheart.tumblr.com and after I pinned it to my board, a friend repinned it and tried it immediately.  She let me know that it was super simple to put together and her family loved it.  It was the first thing I thought of on my super busy day.


I didn't know if my youngest son was going to make it home in time to eat with us, so I made up three sandwiches just in case.  He eventually ate at a friend's house, so I refrigerated the third sandwich and my oldest son ate it later.  He heated it in the microwave, which made the bread more soft than it was when grilled, so I would suggest if reheating this sandwich to put it back on a griddle and reheat it over very low heat so as to keep the crunch on the bread.


I began by placing six slices of bread on my griddle and buttering the top slices of bread.  I then flipped them over so the buttered side was laying on the griddle.


I "opened" the sandwiches in order to add the filling.  The first of which was a slice of mozzarella cheese.


The original recipe didn't call for it, but I sprinkled some dry oregano leaves on next.  It did say that some parmesan cheese could be added at this point, but I didn't have any on hand, so I omitted that.


I followed that up with a layer of pepperoni.


Then I added another slice of mozzarella cheese.


The original recipe indicated that the finished sandwich could be dipped in pizza sauce, but I would have felt I needed to heat it first and that was another step I didn't have time for, so I decided to spread it on the top slice of the bread, so we could enjoy the flavor in every bite.


I then turned the pizza sauce side of the bread over so it was on top of the mozzarella and buttered the top of the sandwich.


I find that cooking grilled cheese is always best over a low heat, turning when the first side is toasty and brown.


Once the other side is toasted, it's ready to cut and serve.  This is a pretty tasty little sandwich that takes hardly any time to put together and kids of all ages will like it (my friend who made it first has twin girls who are almost 2 yrs. old and they liked it).  Enjoy!

Pizza Grilled Cheese

2 slices of bread
butter 
2 sliced mozzarella cheese
dried oregano
9 pepperoni slices
pizza sauce

Place bread on griddle; butter top slice of bread.  Flip bread so buttered side is against griddle.  Set aside unbuttered piece of bread.  Layer on top of buttered bread, 1 slice of mozzarella cheese, oregano, pepperoni, 1 slice of mozzarella.  Spread pizza sauce on unbuttered slice of bread and place sauce side down on top of mozzarella.  Butter plain side of bread.  Cook over low heat until bottom piece of bread is toasty and brown, checking frequently for doneness.  Flip entire sandwich and repeat on other side, removing from griddle when second side is toasty and browned.  

Sunday, August 19, 2012

Puff Peach Cobbler

If I ever need a dessert that I can put together in about half an hour, this is one recipe I turn to.  Except for the canned peaches, I always have all of the other ingredients on hand.  This dessert is super simple to put together, and because it's best served warm with vanilla ice cream, it's ready to serve as soon as it comes out of the oven.


In this case, I was baking this dessert to go with my husband for a bake sale they were having at his work, so I used a disposable foil pan that came with a plastic cover for easy transport.  Apparently, most people made brownies or cookies, so this was one of the first items sold.  I put a note on the lid saying it was best reheated and served ala mode.  My sister gave me this recipe years ago telling me how simple yet tasty it was.


I begin by draining the peaches.  I like to collect the liquid in a measuring cup, as I need to reserve 1/2 cup of this to use in the recipe.  The rest of the syrup can be discarded or saved for another use.


While the peaches are draining, in a medium saucepan, I combine the brown sugar and lemon juice.  To this I add the 1/2 cup of drained syrup and bring it to a boil.


As soon as it boils, I remove the pan from the heat and add the drained peaches, tossing to coat the fruit.


In a medium bowl, I combine the Bisquick and sugar, stirring to combine and breaking up any large lumps.


I add the milk, and stir to combine.  The result is a sticky dough.


I spread the dough in an 8- x 8-inch or 9- x 9-inch baking pan.


The peach mixture gets poured on top of the dough.  I usually spread them out a little to make sure they cover all of the dough.


Then I place dots of butter on top.  As you can see, the peaches are still hot enough that the butter begins to melt as I'm adding it.


The last step is to sprinkle a cinnamon sugar mixture over the top.  There is no amount listed as this is to taste.  I always have cinnamon sugar in my cupboard, but if I want it to be a little richer, I combine some cinnamon with some brown sugar.  Again, it should be added to your liking.


Into the oven it goes for a mere 20 minutes.  When it comes out, it is bubbly and smells heavenly.  It's ready to be served immediately, preferable with vanilla ice cream, or save it for later and serve it at room temperature or reheat it just before serving.  Either way, this is a yummy desert that friends will think it took you hours to make.  Enjoy!


Peach Puff Cobbler

1 can (1 lb. 13 oz.) peach slices
2 tablespoons lemon juice
1/2 cup brown sugar, firmly packed
1 cup Bisquick biscuit mix
2 tablespoons sugar
1/3 cup evaporated milk (not sweetened condensed)
2 tablespoons butter
Cinnamon sugar mix

Preheat oven to 450 degrees.  Drain peaches, reserving 1/2 cup syrup.  In a medium saucepan, heat lemon juice, brown sugar and reserved syrup; bring to a boil.  Remove from heat and add drained peaches, tossing to coat.  In a medium bowl, combine biscuit mix and sugar.  Add milk and combine to make dough.  Spread in a 8- x 8-inch or 9- x 9-inch baking pan.  Pour hot peach mixture over dough.  Dot with butter.  Sprinkle with cinnamon sugar mixture.  Bake at 450 degrees for 20 minutes.  Best served hot or warm with vanilla ice cream, but can also be served cold.