Thursday, June 28, 2012

Mini Cinnamon Rolls

Cinnamon rolls are one of my favorite things to eat.  I don't eat them often, which makes it a real treat when I get to have one.  I'm not a morning person, so making them from scratch is normally out of the question because of the time needed to let the dough rise.  When I find a recipe that sounds good and cuts out that rising time, I like to give it a try.  This one uses refrigerated crescent roll dough and bakes in only 13 minutes!   


In addition to the ease of putting these treats together and the short time invested in doing so, another great thing about this recipe is that the rolls are baked in a mini muffin tin, so you get 16 mini cinnamon rolls from each batch.  The first time I made them, I took them to a Bible study I was attending and everyone loved them and asked for the recipe.  I originally found this recipe on Pinterest by Iowa Girl Eats.  She didn't give exact measurements on a couple of the ingredients, but I've added them to my recipe below for your convenience.


I begin by putting a little flour on my work surface so the dough doesn't stick.  When I open the can and take out the dough, I "peel" off the first rectangle of dough and place it on my surface.  Then I pinch together the perforated seams, flip the dough over (making sure there is more flour underneath) and pinch the seams on the other side.


I then lightly roll the dough with a rolling pin to smooth out the seams and to make the dough a uniform thickness.


In a small bowl, I combine the brown and white sugars with the cinnamon.


Next, I spread half of the butter on the dough.  This helps to make the cinnamon/sugar mixture adhere a bit to the dough and contributes to the ooey, gooey goodness once baked.  Sorry, I forgot to take a picture of this step before I started adding the cinnamon/sugar mixture.


Using a tablespoon, I sprinkle half of the cinnamon/sugar mixture over the dough, then using the back of the spoon, spread it over the dough, almost to the edges.


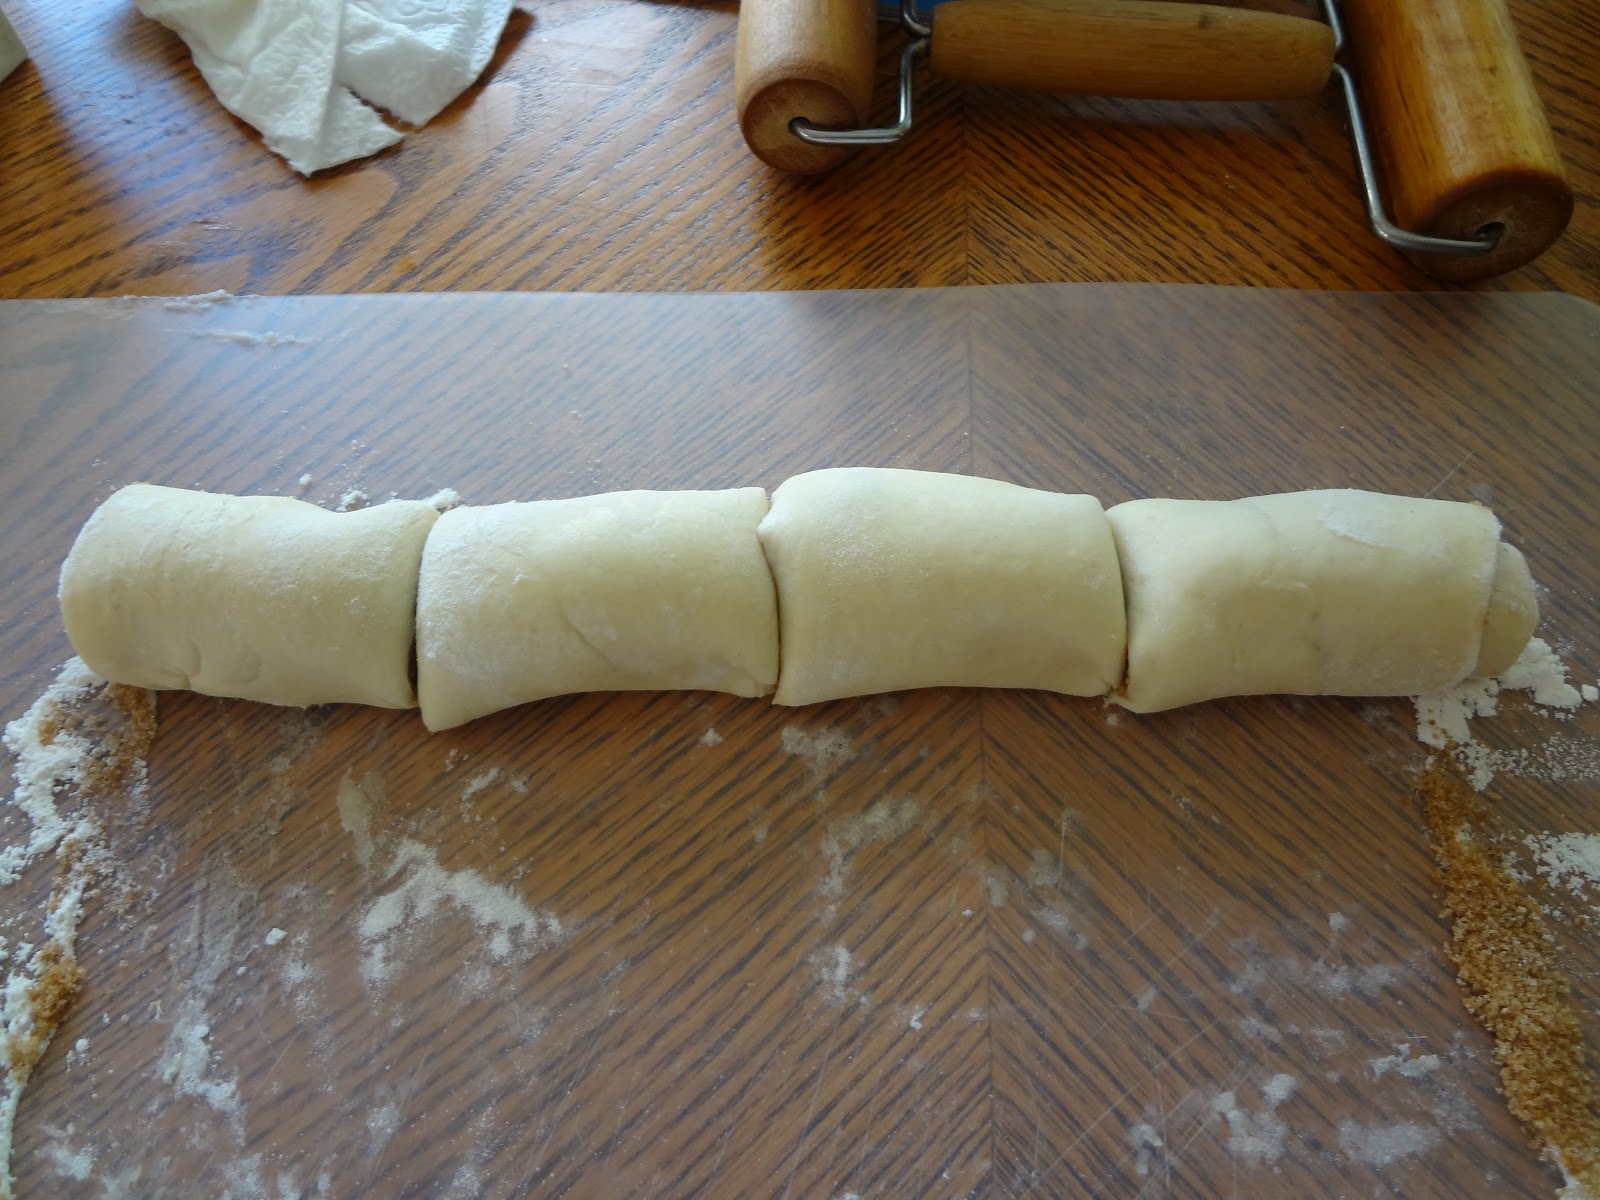
The next step is to start rolling the dough into a log, beginning on the long side.  Because of the dry cinnamon/sugar mixture, this won't be a tight roll.


I didn't measure it, but I would guess it is about a foot long when rolled up (left).  Make a cut right in the middle to make 2 pieces (right).


 Cut each of those pieces in half (left), and then each of those pieces in half (right).  I then have 8 pieces.

I spray my mini muffin pan before carefully placing the cinnamon rolls in the pan, cut-side up.  Then I repeat with the other piece of dough from the can.  Most mini muffin pans hold either 12 or 24 muffins, so either one large pan or two of the smaller pans should be used.  Hint:  Whenever you use muffin tins where not every space gets used, put some water about half way up in the empty spaces to aid in even baking.


Don't they look scrumptious?  They are a beautiful golden brown and smell heavenly!


About 5 minutes before the rolls come out of the oven, I begin making the icing.  I work the softened butter into the powdered sugar before adding the maple syrup and milk.


Once all of the ingredients are incorporated and smooth, it should be thick enough to spread where the heat of the roll will allow it to melt into the cinnamon crevices!  Hint:  Let the rolls sit for a minute once they come out of the oven so they aren't so hot that the icing all melts to the bottom of the pan.


I usually frost them in the pan before removing them to a serving platter.


I use a spoon to remove each roll from the pan to serve.  This way I don't loose any of the gooey cinnamon goodness that has made it's way to the bottom of the pan.  The only problem with these tiny cinnamon rolls is their size.  It's easy to keep popping them in my mouth before realizing I've eaten more than I would have if I had eaten one normal size cinnamon roll!  It really is hard to stop eating these scrumptious little cinnamon rolls!  Enjoy!


Mini Cinnamon Rolls
  
1 (8 oz.) tube crescent roll dough
3 tablespoons softened butter
1/3 cup firmly packed brown sugar
2 tablespoons white sugar
1 teaspoon cinnamon
¾ cup powdered sugar
2 tablespoons softened butter
1 teaspoon maple syrup
1 teaspoon milk

Preheat oven to 375°.  Lay out half the dough (4 triangles) on lightly floured work surface and pinch all seams together.  Flip the dough and pinch seams together.  Using a rolling pin, smooth the seams and roll the dough until about ¼ thick, keeping the rectangular shape.  Spread half of the butter on the dough coming almost to the edges.  In a small bowl, combine the sugars and cinnamon.  Sprinkle sugar mixture over butter, covering completely.  Starting at the long side, carefully roll dough into a log.  With a sharp knife, make one cut in the middle of the log, cutting it in half.  Cut each of these pieces in half, then each of the resulting pieces in half again.  You should have 8 pieces.  Place each piece in a mini muffin pan sprayed with a non-stick coating.  Repeat with the other half of dough.  Bake at 375° for 13 minutes, or until golden brown.  Meanwhile, in a small bowl, mix together powdered sugar and butter; and syrup and milk.  Remove buns from oven, let sit for 1 minute before icing.  Enjoy!

Sunday, June 24, 2012

Almost a Dagwood Sandwich

When it's so hot outside that I don't feel like turning the oven on inside to make dinner, I often turn to one of my tried and true recipes for a good healthy sandwich.  I'm not using the word healthy in the way it is used commonly these days.  I'm using it the way my wee, Irish mother would use it - to say that it is piled high with yumminess.   A healthy portion of anything means no scrimping on ingredients and nobody leaves hungry!


I call this sandwich the Almost Dagwood because of it's height; it's pretty tall, but I can still get my mouth around it!  The combination of two different spreads, two kinds of meat, plus sweet onions, tomatoes and lettuce is to die for.  WhenI made this the other day, my husband cut his portion in half, thinking he couldn't eat it all, but returned for the second half because he couldn't help himself, it was that good!  

I found this recipe in one of those small cookbooks you find at the checkout stand in the market.  This one was published in 2010 and put out by General Mills.  I did alter the ingredients a little from the original recipe, so the recipe below is how I make it now.


The only cooking step is to fry some strips of bacon (no picture available), so I get that going first.  As I'm keeping watch on the bacon and turning the pieces as necessary, I begin the assembly process.  The original recipe called for an herb-flavored or cheese-flavored bread, such as Focaccia, Ciabatta or Asiago.  I think a Focaccia works best for this sandwich, so I get the Tomato & Olive Focaccia bread from Trader Joe's.

I begin by placing the bread on a cutting board that is big enough to hold both pieces side-by-side when cut, as they both will get topped with a spread.  I cut it open and add the herb cheese to the side that will be the bottom of the sandwich.


Then I begin layering the filling ingredients.  The turkey (left) goes on first, followed by the mozarella cheese (right).

Next is the Italian dry salami (left) followed by the fresh basil leaves and bacon (right), which was cooked and drained on paper towels.
The sweet onion (left) is next.  I want to make sure there is onion flavor in every bite, but not to the point of overwhelming the taste, so that is why I apply my rings like this as opposed to using slices!  Silly me!  The tomatoes (right) are next.  I have to cut them almost paper thin, using a mandoline, to get my youngest son to eat them in a sandwich, otherwise he picks the tomatoes out because he things they're "totally gross!"


The lettuce is the final stackable ingredient.  The top of the bread that has been waiting patiently gets spread with a prepared pesto.  I've got to tell you my mouth is watering right now!

Put the top on the sandwich and cut it into the desired size pieces.  If you want the pieces fairly small, putting a long pick in what will be the middle of each piece will help keep the sandwich together as you cut it.  This sandwich can be made ahead of time and stored in an air-tight container for up to 24 hrs.  This makes it perfect for a picnic, or for eating any leftovers the next day!


As my wee, Irish mom would say, "Doesn't it look good enough to eat?"  Enjoy!

Almost a Dagwood Sandwich

1 loaf Focaccia bread (approx. 1 lb. and about 1 inch thick)
1 small container garlic-and-herbs spreadable cheese
1/2 lb. thinly sliced smoked turkey
4 oz. sliced mozzarella cheese
4 oz. sliced Italian dry salami
1/4 cup loosely packed fresh basil leaves
8 slices bacon, cooked
1/2 of a sweet onion, thinly sliced and separated into rings
2 Roma (plum) tomatoes, thinly sliced
Green leaf lettuce leaves
4 oz. prepared basil pesto

In a frying pan, cook bacon until crisp, drain on paper towels.  In the meantime, on a large cutting board, cut the bread horizontally, laying each piece side-by-side as if opening a sandwich.  Spread the garlic-and-herb cheese on the bottom half.  Layer with the turkey, mozzarella, salami, basil, bacon, onion rings, tomatoes and lettuce.  Spread top half with basil pesto; place on top of stacked sandwich ingredients.  Cut sandwich in to desired size pieces.

Tuesday, June 19, 2012

Crock Pot Fajitas

Besides craving a particular dish, there are two good reasons I use when I choose to make dinner in a crock pot: to keep the kitchen from getting hot in the summer and when I have plans where I won't have time to put a meal together when I get home.  When my boys were younger and had sports practice after school, having dinner ready in the crock pot when we got home was the best thing ever.


I found this recipe on an ad in the newspaper for Hunt's Diced Tomatoes.  The fajitas were to be baked in the oven, but I converted the recipe to work in the crock pot one day and have never made the dish in the oven again.  The vegetables are not as crisp tender as when cooked the traditional way, but the flavor more than makes up for that.  


 The spices and oils are placed directly in the crock pot and mixed together.


Then the flank steak is cut into very thin slices.


The meat is placed in the crock pot and tossed until all of the pieces are coated with the spices.

Then the vegetables get sliced into thin strips.  To get onion strips, I cut the onion in half and then cut each half into thin strips and separate the pieces into individual pieces.


The pepper strips and onions get placed on top of the beef.


The last layer is the canned tomatoes with green chilies.  At this point, the lid could be put on top and the crock pot turned on to low for 5 hours.  Or, if the preparation is done much earlier than needed, the removable crock can be covered with plastic wrap and placed in the refrigerator until ready to cook.  When I do this, I add an extra 15 minutes to the cooking time to bring the pot up to temperature from having been in the refrigerator.  I pull the crock out of the refrigerator, take off the plastic wrap, put the lid on and turn it on and let it go.


When the dish is done and you lift the lid, you'll see that the mixture has cooked down quite a bit.  One of the keys to cooking in a crock pot is to not lift the lid until the dish is completely done (unless the recipe calls for adding an ingredient shortly before the end of cooking time) because it greatly reduces the temperature inside the crock which takes a long time to come back up to the cooking temperature.


Before serving, I mix the beef and vegetables together.  Cooking in a crock pot keeps everything very moist, therefore there are a lot of juices in this dish, so I use tongs to transfer the fajita meat mixture to a warmed tortilla for eating.


Sour cream and/or guacamole can be added at this point, but we like the flavor so much as is, that we never add anything to our fajitas.  Enjoy!

Crock Pot Fajitas

4 tablespoons vegetable oil
4 teaspoons chili powder
4 teaspoons ground cumin
1 teaspoon salt
2 pounds flank steak
2 cans (14.5 oz.) diced tomatoes with mild green chilies
2 small green bell peppers
2 small red bell peppers
1 large brown onion
Flour tortillas

In a 4 - 5 qt. crock pot, mix together oil and spices.  Thinly slice beef across the grain into thin strips; add to crock pot and toss until all pieces are coated in spice mixture.  Cut peppers and onions into thin strips.  Place on top of steak.  Add canned tomatoes.  Cover and cook on low for 5 hours.  Mix all ingredients in crock pot; serve in tortillas.

Friday, June 15, 2012

Chicken Salad Sandwiches with Blueberry Jam

I've been collecting recipes for foods to serve at teas for several years now, and I must say this in one of my all-time favorite sandwiches to serve.  I found the original recipe for Blueberry Chicken Salad in the July/August issue of Tea Time magazine.  When I decided to try the recipe, fresh blueberries were not in season, and therefore unavailable at my local market.  A couple of years prior, my friend, Gina Madden, had made a chicken salad sandwich for a tea at the church and had used a fruit jam on the bread as a spread before adding the chicken salad.  I had loved the flavor of those sandwiches, so I decided to see if I could find a blueberry jam in lieu of the fresh blueberries.  I found one and, because the sandwiches made this way were such a hit, I've never tried making them the way the original recipe was written!


One reason that this chicken salad is so tasty is that both the light and dark meats of a rotisserie chicken are used.  This makes it more moist, and I think, more flavorful.  I frequently buy one of these chickens when I go to Costco and leave it on the counter to cool for about an hour.  I then remove all the meat, breaking it into small pieces, and put it in a freezer bag in the freezer if I'm not using it immediately.  At any given time, I usually have a bag of this chicken in the freezer.  This cuts down on the preparation time when I want to make these sandwiches.

To make a fine texture, I pulse the fresh or thawed chicken meat in my food processor for about 15 seconds and remove it to a large bowl.  The next step is the most tedious.  I wash the grape tomatoes and then cut each one in half across and then cut each half in quarters.  They have to be cut this way so the pieces are not too large in the chicken salad.  I add the tomatoes to the chicken, cut the green onions; add them and toss all the ingredients together to combine.  Then I add the mayonnaise, salt and pepper and mix until well combined.

Tea sandwiches never have crusts, so I stack two slices together to cut off the crusts.  This way they match perfectly when the sandwich is put together.  I then lay the two pieces on a cutting board as if I've just opened the sandwich.  I spread a thin layer of the blueberry jam each slice.  If I'm making these sandwiches ahead of time, first I spread each slice of bread with a very thin layer of butter to keep the blueberry jam from soaking into the bread.  Then I top one side with the chicken salad mixture, spreading to the edges of the bread, and put the other piece of bread on top, jam side down.  For a tea, the sandwich gets cut into four pieces, whether squares or triangles.  If making several types of sandwiches for a tea, I usually mix up the shapes as well as the types of breads I use.

This in one of the most tasty tea sandwiches I make.  Enjoy!


Chicken Salad with Blueberry Jam


1 (2 ½-pound) rotisserie chicken
1 pint grape tomatoes, halved and quartered
1 cup thinly sliced green onions
1 cup mayonnaise
½ teaspoon salt
½ teaspoon pepper
Blueberry preserves
1 loaf of sandwich bread

Remove meat from chicken; discard skin and bones.  Place meat in the bowl of a food processor, and pulse until coarsely chopped, about 15 seconds.

In large mixing bowl, combine the chopped chicken, tomatoes, and green onion.  Add the mayonnaise, oil, salt, and pepper, and mix until well combined. 

To assemble sandwiches, spread each bread slice (I use 100% whole wheat bread) with a thin layer of blueberry preserves.  Place a generous portion of chicken salad on one side of sandwich, spreading to the edges.  Place the other side on top and cut into desired size and shape.  (The blueberry preserves should be on the “inside” of the sandwich).

For tea sandwiches, I cut off the crusts before assembling and once assembled, cut each sandwich into four triangles.


Devonshire Cream

When I posted the recipes from my Valentine's tea, I neglected to add the recipe for Devonshire Cream, which along with your favorite curd and jam, makes the perfect accompaniment for fresh scones.  Having made a fresh batch for my tea yesterday, I thought this was a good time to share my recipe.  Lora Prange, a friend from church shared this recipe with me several years ago, and it is always well received.  In fact, yesterday one of my friends even spread it on a jam straw I served as one of my dessert choices!


This recipe has only 4 ingredients which need to be beaten with an electric mixer in a medium bowl.  I have found that the best way to get a smooth texture is to combine the Mascarpone cheese with the sugar and vanilla first, beating on a medium speed to combine, then add the whipping cream and beating on high until soft peaks form.  I usually make it right before serving, but it can also be made ahead and refrigerated until serving.

Devonshire Cream
(also known as Devon Cream)

4 ounces Mascarpone cheese
2 tablespoons granulated white sugar
1 teaspoon vanilla extract
1 cup heavy whipping cream

In a medium bowl, combine Mascarpone cheese, sugar and vanilla with an electric mixer on medium speed.  Add the whipping cream and beat on high until the mixture holds it shape and creates soft peaks.  Refrigerate until serving.

Watermelon Gazpacho

Serving tea is one of my favorite things to do for friends.  Yesterday I had several friends over for a tea where this recipe was a surprising hit.  I found this recipe in the July/August 2011 issue of Tea Time magazine and thought I'd try it for a summertime tea.  This cold soup was very refreshing and very easy to make with only 6 ingredients.


Of course, when having a tea, everything must be served in something pretty.  I thought this champagne glass was the perfect vessel for this chilled soup.  I'm not a big fan of watermelon, so having all of the ingredients equally detected meant that I was not overwhelmed with the flavor of mostly watermelon.  

Regular watermelons have black and white seeds and I've always heard that you shouldn't eat the black ones, but the white ones are okay to eat.  For that reason and to save time I bought the seedless variety and was dismayed to discover seeds inside.  I started to think about why God would make a fruit with both good and bad seeds, so I decided to Google watermelon seeds for answers.  Apparently all watermelon seeds are edible and neither will make a watermelon grow inside you!  The white seeds are immature and the black ones are mature.  The seeds found in a seedless watermelon are empty, therefore infertile.  I had my answer, so I wasn't going to worry about trying to remove the seeds from my seedless watermelon!


Having a food processor or good blender is a necessity for ease in making this soup.  The first step in preparing this dish is to puree the watermelon.  As seedless watermelons are smaller, I bought 2 to get the 8 cups of puree I needed for this recipe.  


I began by using the pulse feature to make the pieces a bit smaller before turning it on to completely turn the melon to liquid.  I did one melon at a time so that the liquid level wouldn't get to high and leak out under the blade attachment.  I learned that the hard way!  After each melon was pureed, I poured it into a 4-cup measuring cup to make sure I had the perfect amount before transferring it to a large bowl.


Then I coarsely chopped the red bell pepper, red onion, English cucumber, and cilantro and added them to the work bowl with the lime juice.  I began by using the pulse feature and felt as though it needed a little more liquid to get the desired texture, so I added back in about 3/4 cup of the pureed watermelon.  Once all the ingredients were chopped very fine, I added them to the bowl with the watermelon and mixed to combine, covered it and let it chill for a couple of hours until serving.


A small sprig of the cilantro on top and the soup was ready to serve.  It was a surprising treat and such a pretty color also!  Enjoy!

Watermelon Gazpacho

8 cups pureed watermelon (approximately 1/2 large watermelon or 2 seedless watermelons)
1 cup coarsely chopped red bell pepper
1 cup coarsely chopped English cucumber
1 cup coarsely chopped red onion
1/4 cup fresh cilantro leaves
1/4 cup fresh lime juice
Garnish:  fresh cilantro leaves

In the work bowl of a food processor, puree the watermelon in two batches, measuring each batch before transferring to a large bowl.  Add remaining ingredients to food processor with 3/4 cup of watermelon puree; pulse until very finely chopped.  Add to watermelon puree; stir until combined.  Cover and refrigerate for several hours until cold.  Serve cold.  Garnish individual servings with a sprig of fresh cilantro, if desired.