Showing posts with label Pizza. Show all posts

Friday, April 26, 2013

Skillet Pizza

This has got to be one of the quickest and easiest pizzas I've ever put together, and any of the toppings can probably be substituted with your favorites! 


I found this recipe in one of my recent Reiman Publications, probably Simple & Delicious.  I couldn't put my hands on the exact one before adding this to my blog, so I can't give full credit where it is due, and I can't tell you exact amounts of ingredients.  It's so easy anyone can figure it out!  This dish gets almost all 9's on the Melnarik rating scale.  My husband doesn't care for thin crust, so he gave it an 8!


In a small skillet, heat about 1/2 teaspoon of olive oil.  Add some thinly sliced yellow bell pepper and red onion.  Begin to saute vegetables over medium-low heat.


In the meantime, very thinly slice about 3 fresh mushrooms.  When the onion and pepper are beginning to soften, add the mushrooms and cook until vegetables are tender and the mushrooms are reduced.  Remove vegetables to a plate.


In the same skillet, add another 1/2 teaspoon of olive oil.  Add one medium (soft taco size) tortilla and warm about 30 seconds or so, or until it feels slightly hot to the touch.  Do not let it get really crispy.


Flip the tortilla over (you can see that it got a little crispy on the first side).  It will be on this side longer as the toppings are added and the cheese needs time to melt.


As soon as you flip it, spread some prepared pizza sauce on top.


Then add the pepperoni slices.  When first making this, I thought it was odd to have the pepperoni under the cheese, so I experimented putting on top.  But, it's better closer to the source of heat to get the  pepperoni hot.


Sprinkle some Mexican cheese blend (cheddar and Monterey jack cheeses) on top of the pepperoni.


Add the sautéed vegetables on top of the cheese.


Sprinkle a some diced tomato on top of that, cover the skillet and let it cook until the cheese is melted (about 1 - 2 minutes).


How simple is that?  In my house, I have two young men, who are hungry often.  This pizza can be on a plate in front of them in about 15 minutes!  And it's oh so tasty!  Enjoy!

Saturday, November 3, 2012

Liza's Pizza Pasta Toss

This is one of those dishes that is hearty, tastes somewhat like pizza (which most kids love) and it's easy to prepare.  I call that a winning recipe!


I originally found this recipe in my May/June 2009 issue of Simple and Delicious, but each time I've made it I've changed it a little to suit my family's taste and make it blog worthy!  This recipe now gets 8's and 9's on the Melnarik rating scale.  With so many changes to the original recipe, I now call it my own!


I begin by putting some water in a Dutch oven over high heat to start boiling it to cook the pasta.  Meanwhile, in a large saucepan, I combine the Italian sausage, bell pepper and mushrooms.  I cook this mixture until the meat is browned and the vegetables are tender, breaking up the sausage as it cooks.


My first cooking teacher in Jr. High taught that if several dry spices are to be added to a dish, they should be combined in a small bowl first.  This way they are more easily distributed evenly in the dish.  I've always done this, plus I add it directly to the meat (once the fat is drained off) so the heat of the pan sears the spices to it.


Once combined, the spices get added to the meat mixture, stirring occasionally as it continues to cook.


Next in the pan goes the pepperoni.  I like to use the Hormel brand of pepperoni in the 3.5 oz. box and cut the pieces in half before peeling them apart and adding them to the pan.  I cut them in half so there aren't really big pieces of pepperoni in the dish, plus it doubles the number of pieces so there is likely to be pepperoni in each bite!


To this mixture I add the pizza sauce and diced tomatoes, mixing thoroughly and heating through for about 5 minutes.


Once the pasta is cooked according to the package directions, I drain it and add the meat mixture, stirring to combine.


Once I transfer it to a serving dish, the mozzarella cheese gets added to the top of the piping hot dish, which makes it melt perfectly.


This is an easy pasta dish, which is loaded with flavor.  Enjoy!


Liza’s Pizza Pasta Toss

3 ½ cups uncooked spiral pasta
1 pound Italian sausage
1 cup sliced fresh mushrooms
1 bell pepper, diced
1 (14 oz.) jar pizza sauce
1 (4.5 oz.) can petite diced tomatoes
3.5  ounces pepperoni slices, halved
4 ½ teaspoons sugar
1 teaspoon Italian seasoning
¼ teaspoon salt
½ teaspoon garlic powder
½ teaspoon dried oregano
½ teaspoon dried minced onion
2 cups shredded mozzarella cheese

Cook pasta according to package directions.  Meanwhile, cook Italian sausage, mushrooms, and bell pepper in a Dutch oven over medium heat; drain.  Add the rest of the ingredients except cheese; cook and stir for 5 minutes.  Strain pasta; add to meat mixture, stir to mix thoroughly; heat through.  Sprinkle with cheese, remove from heat, cover until cheese is melted.

Monday, September 17, 2012

Liza's Mini Pizzas

Every kid loves pizza and this was one of my boy's favorite things to request for dinner as they were growing up.  It was a favorite of mine because of how quickly I could put it together and I knew they were always going to eat every last bite.


This is still one of my go to meals when I'm feeding my family at three different times and I don't have a lot of time to put something together.  Because of my time constraint, I didn't take time to measure anything in order to type up an actual recipe for you.  I put these mini pizzas together visually, and hope you can do the same by following my pictures.  My boys give these mini pizzas 9s on the Melnarik rating scale.


After preheating the oven to 400 degrees, I begin by "opening" English muffins and placing them on a baking sheet.


I top each half with some pizza sauce (not so much that it oozes out in each bite, but to cover the bread).  I used to use Ragu Pizza Quick Sauce Traditional flavor, but I can't find that product any more.  I now use the Prego Pizza Sauce, which comes in a jar.


For a little more flavor, I then sprinkle on some dried oregano.


Then I add a layer of shredded mozarella cheese.


On top of that, I add some medium cheddar for extra flavor.


The last thing is the topping and in our case, pepperoni is the topping of choice.  I add four slices to each pizza so there's a pepperoni in each bite!  I use the Hormel brand that comes in the red box, as the slices are just over an inch in diameter and fit best on these mini pizzas.


I put them in the oven at 400 degrees for 15 minutes and when they come out they are hot and the cheese has melted and the kids can't wait to dig in.  As the cheese melts, some of the pepperoni slices may slide off the pizzas. I just push them back towards the middle.  Nobody around here really cares what they look like, they just care about how good they taste.


We usually wait about a minute before eating them, because they are simply too hot directly out of the oven.  I serve them directly from the baking sheet so as to keep them warm, but my boys inhale these so quickly, there really isn't time for them to cool down too much!  Enjoy!

Wednesday, August 22, 2012

Pizza Grilled Cheese

One evening I needed to throw together dinner really fast so I turned to this recipe I found on Pinterest.    It originated at thewaytoaheart.tumblr.com and after I pinned it to my board, a friend repinned it and tried it immediately.  She let me know that it was super simple to put together and her family loved it.  It was the first thing I thought of on my super busy day.


I didn't know if my youngest son was going to make it home in time to eat with us, so I made up three sandwiches just in case.  He eventually ate at a friend's house, so I refrigerated the third sandwich and my oldest son ate it later.  He heated it in the microwave, which made the bread more soft than it was when grilled, so I would suggest if reheating this sandwich to put it back on a griddle and reheat it over very low heat so as to keep the crunch on the bread.


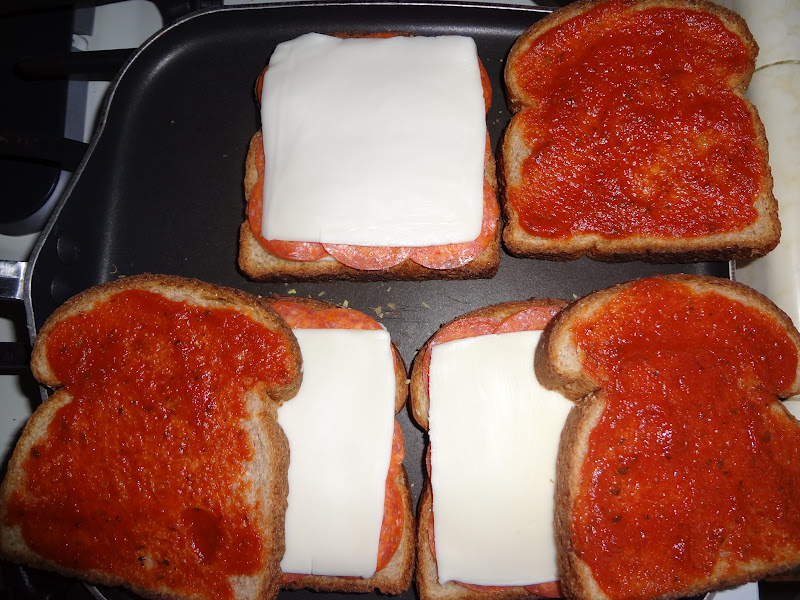
I began by placing six slices of bread on my griddle and buttering the top slices of bread.  I then flipped them over so the buttered side was laying on the griddle.


I "opened" the sandwiches in order to add the filling.  The first of which was a slice of mozzarella cheese.


The original recipe didn't call for it, but I sprinkled some dry oregano leaves on next.  It did say that some parmesan cheese could be added at this point, but I didn't have any on hand, so I omitted that.


I followed that up with a layer of pepperoni.


Then I added another slice of mozzarella cheese.


The original recipe indicated that the finished sandwich could be dipped in pizza sauce, but I would have felt I needed to heat it first and that was another step I didn't have time for, so I decided to spread it on the top slice of the bread, so we could enjoy the flavor in every bite.


I then turned the pizza sauce side of the bread over so it was on top of the mozzarella and buttered the top of the sandwich.


I find that cooking grilled cheese is always best over a low heat, turning when the first side is toasty and brown.


Once the other side is toasted, it's ready to cut and serve.  This is a pretty tasty little sandwich that takes hardly any time to put together and kids of all ages will like it (my friend who made it first has twin girls who are almost 2 yrs. old and they liked it).  Enjoy!

Pizza Grilled Cheese

2 slices of bread
butter 
2 sliced mozzarella cheese
dried oregano
9 pepperoni slices
pizza sauce

Place bread on griddle; butter top slice of bread.  Flip bread so buttered side is against griddle.  Set aside unbuttered piece of bread.  Layer on top of buttered bread, 1 slice of mozzarella cheese, oregano, pepperoni, 1 slice of mozzarella.  Spread pizza sauce on unbuttered slice of bread and place sauce side down on top of mozzarella.  Butter plain side of bread.  Cook over low heat until bottom piece of bread is toasty and brown, checking frequently for doneness.  Flip entire sandwich and repeat on other side, removing from griddle when second side is toasty and browned.  

Thursday, May 24, 2012

Pizza Dogs

Make anything that resembles a pizza or has the flavors of a pizza and you're almost guaranteed that kids will like it.  I first tasted a Pizza Dog when I had my first job at a Hallmark store in a mall and went to Orange Julius on my break for lunch.  I was sold after eating my first one and decided I needed to recreate this dressed up hot dog at home.  This is a fairly quick thing to put together and it's another great recipe for feeding my family at two separate seating times.


The key to making the perfect Pizza Dog is in how the cheese gets melted.  I have tried several ways and found the best way is to steam the whole thing once assembled.  Orange Julius had a steaming machine they used, so I assumed that would be the best method.  It can be microwaved, which is the fastest way to do it, but I find this method makes the bun rubbery or chewy.  I've tried the oven, but this tends to dry out the bun.  When steamed, the bun gets warm as the cheese melts, but it doesn't change the texture.  I don't have a steamer, so I usually use a roaster heated to 350 degrees with about 1/2 inch of water on the bottom and a rack on which to place the container holding the dogs.


I get the hot dogs on the stove first, as it takes a few minutes for the water to boil.  I prefer using the bun-size dogs.


Then, I put the pizza sauce in a small saucepan to heat over low heat.  The best sauce I found was Ragu Pizza Quick Sauce in Traditional flavor.  Unfortunately, I haven't been able to find that one in a while.  I haven't yet found one that matches it in flavor.


When the sauce is heated, I add about 1 tablespoon of sauce to the bottom of the buns.  Choosing what to put the buns on/in is important as you don't want the bun to totally split in half or for it to fall over spilling the cheese everywhere.  I picked something with sides to help keep the buns in place and chose one that would also fit in my roaster and not be affected by the steam heat.  When making these for lots of teenagers, I've used the cardboard holders from Smart & Final that usually are used to hold French fries at fast food restaurants.


Next, I add the hot dogs to the buns.


Then, I spread another 2 tablespoons of sauce on each hot dog.


Approximately 1/3 cup of shredded mozzarella cheese goes on next.


Then, I shake on a little dried oregano for a little extra flavor.


Finally, I add approximately 2 tablespoons of cheddar cheese.


The dish then goes into the roaster for about 2 minutes to steam.  Once I forgot to put the lid on as I went back to building the next few dogs and discovered that the cheese doesn't melt without the lid on!


I don't really time them while they are steaming.  When I check them and they look like this, they are done and are ready to be served!


Doesn't that look like something you want to sink your teeth into?  When I need to make a lot at a time, I put them in a 9x13-inch dish and steam them in my 18-quart roaster.  Enjoy!


Pizza Dogs
1 pkg. hot dogs (8 dogs)
1 pkg. hot dog buns (8 buns)
1 1/2 cups pizza sauce
2 2/3 cups shredded mozzarella cheese
1 cup shredded cheddar cheese
dried oregano to taste

Place the hot dogs in a medium saucepan over high heat to boil.  Once the water comes to a full boil, cook for 2 minutes.  In the meantime, place the pizza sauce in a small saucepan; cook over low heat, stirring occasionally.  Prepare a roaster by putting a rack in it and heating 1/2 inch of water at 350 degrees.  Place the buns in a non-heat sensitive dish/pan with sides so that the buns will sit properly to add fillings, making sure the pan will fit in the roaster.  When sauce is heated, spoon 1 tablespoon into each bun.  Place a cooked hot dog in each bun and top with 2 tablespoons of pizza sauce.  Top each one with approximately 1/3 cup of mozzarella cheese.  Shake a small amount of dried oregano, to taste, on top and add approximately 2 tablespoons of cheddar cheese next.  Place the pan with the hot dogs in the roaster and replace the lid.  Steam for approximately 2 minutes.  Using a hot mit, remove the pan from the roaster (be careful as steam can burn!).  Remove Pizza Dogs to a serving platter or individual plates.  Best served piping hot!