Sunday, August 19, 2012

Puff Peach Cobbler

If I ever need a dessert that I can put together in about half an hour, this is one recipe I turn to.  Except for the canned peaches, I always have all of the other ingredients on hand.  This dessert is super simple to put together, and because it's best served warm with vanilla ice cream, it's ready to serve as soon as it comes out of the oven.


In this case, I was baking this dessert to go with my husband for a bake sale they were having at his work, so I used a disposable foil pan that came with a plastic cover for easy transport.  Apparently, most people made brownies or cookies, so this was one of the first items sold.  I put a note on the lid saying it was best reheated and served ala mode.  My sister gave me this recipe years ago telling me how simple yet tasty it was.


I begin by draining the peaches.  I like to collect the liquid in a measuring cup, as I need to reserve 1/2 cup of this to use in the recipe.  The rest of the syrup can be discarded or saved for another use.


While the peaches are draining, in a medium saucepan, I combine the brown sugar and lemon juice.  To this I add the 1/2 cup of drained syrup and bring it to a boil.


As soon as it boils, I remove the pan from the heat and add the drained peaches, tossing to coat the fruit.


In a medium bowl, I combine the Bisquick and sugar, stirring to combine and breaking up any large lumps.


I add the milk, and stir to combine.  The result is a sticky dough.


I spread the dough in an 8- x 8-inch or 9- x 9-inch baking pan.


The peach mixture gets poured on top of the dough.  I usually spread them out a little to make sure they cover all of the dough.


Then I place dots of butter on top.  As you can see, the peaches are still hot enough that the butter begins to melt as I'm adding it.


The last step is to sprinkle a cinnamon sugar mixture over the top.  There is no amount listed as this is to taste.  I always have cinnamon sugar in my cupboard, but if I want it to be a little richer, I combine some cinnamon with some brown sugar.  Again, it should be added to your liking.


Into the oven it goes for a mere 20 minutes.  When it comes out, it is bubbly and smells heavenly.  It's ready to be served immediately, preferable with vanilla ice cream, or save it for later and serve it at room temperature or reheat it just before serving.  Either way, this is a yummy desert that friends will think it took you hours to make.  Enjoy!


Peach Puff Cobbler

1 can (1 lb. 13 oz.) peach slices
2 tablespoons lemon juice
1/2 cup brown sugar, firmly packed
1 cup Bisquick biscuit mix
2 tablespoons sugar
1/3 cup evaporated milk (not sweetened condensed)
2 tablespoons butter
Cinnamon sugar mix

Preheat oven to 450 degrees.  Drain peaches, reserving 1/2 cup syrup.  In a medium saucepan, heat lemon juice, brown sugar and reserved syrup; bring to a boil.  Remove from heat and add drained peaches, tossing to coat.  In a medium bowl, combine biscuit mix and sugar.  Add milk and combine to make dough.  Spread in a 8- x 8-inch or 9- x 9-inch baking pan.  Pour hot peach mixture over dough.  Dot with butter.  Sprinkle with cinnamon sugar mixture.  Bake at 450 degrees for 20 minutes.  Best served hot or warm with vanilla ice cream, but can also be served cold.

Monday, August 13, 2012

Mexicorn Dip

This was a new recipe I tried for our annual beach trip this year and it was a huge hit.  As I was making it, I thought the amount was so great that I'd be bringing some home for sure, but every drop disappeared on the beach!


Everyone who tried this dip raved about it.  My youngest son brought a friend with him this year and I discovered that he is a vegetarian the first day of our trip.  I hadn't prepared anything specifically for him to eat, so I was glad I had made this dip, which he loved!  I found this recipe on Pinterest but it originated on tastykitchen.com.


In a large bowl, I combined the mexicorn, diced green chilies, diced bell pepper and diced jalapenos.  The recipe also calls for diced green onions, but I chose to bring them to the beach separately and add them just before serving, as I was afraid they may get wilted if I added them the day before serving this dip.


After shredding the cheese, I added it to the vegetable mixture.


Then I added the sour cream and mayonnaise.  I used a Tupperware bowl, because in addition to being airtight like all Tupperware is guaranteed to be, any container with a round seal is also guaranteed to liquid tight.  It's insurance that as the ice melts in my cooler, no water will get into my Tupperware bowl!  As the recipe suggested, I served this dip with Frito's Scoops.  Enjoy!


Mexicorn Dip

2 cans (11 oz. each) Mexicorn, drained
1 can (4 oz.) diced green chilies
1 whole bell pepper, diced
3 whole green onions, chopped
2 jalapenos, diced (remove seeds)
8 ounces sharp cheddar cheese, shredded
1 cup sour cream
1 cup mayonnaise

Mix all together; refrigerate until serving with Frito's Scoops.

Stromboli


This sandwich is one of the most amazing things I make, according to some people.  I've made it every year, except one, for our annual beach trip.  The one year I didn't bring it, thinking people were getting tired of the same thing every year, people were freaking out.  They couldn't believe I would even consider not bringing Stromboli to the beach!  I got the message loud and clear.  My oldest son told me this year, when I asked him what he'd like me to take to the beach this year, that as long as I brought Stromboli and Trail Balls (previous post) he'd be happy!


After letting it cool completely, I have to cut the sandwich in half to make it fit in Tupperware to take to the beach.  I keep it in the cooler until we're about ready to eat, then I take it out and let it sit in the sun for about 15 minutes to take the chill off.  I cut it into thin strips, about an inch wide, and serve it to my family and friends.  There are people who've gotten upset in the past if they've been away from the group when I'm serving the Stromboli and haven't gotten a piece.  Yes, it's that good!


One thing that makes this sandwich a little easier to prepare is that it uses Bridgford frozen dough, so I don't have to make my own!  The package contains 3 - 1 pound loaves and this recipe calls for 2 loaves.  Because this sandwich is so popular among our friends, I've started using the third loaf to make another half-size sandwich.  I begin by putting the frozen bread dough in a bowl as I go to bed to let it defrost and rise over night.


When I go to the kitchen the next morning, it has risen nicely and it's ready to use.  I won't talk about what my youngest son thinks the dough looks like at this point!  


I punch the dough down to get the air out of it.


I used to take the dough from the bowl and put it on a lightly floured surface to begin working with it, but as I rolled it, because it has a lot of elasticity, it didn't want to retain it's shape.  If I used less flour, then it stuck to the surface and it was hard to work with when I had to pull the top side over the filling and to try to move it to the baking sheet.  Along the way, I got smart and decided to roll it out on the Reynold's Non-stick Aluminum Foil.  By the way, I love this product.  In this case, the dough stays put as I roll it out, yet it doesn't stick when I have to move it in any way.  Later, I'll explain another benefit to using the foil.


I still use a little flour, but only on the top so the rolling pin doesn't stick to the dough.


I roll the dough out into a large rectangle, measuring it to my baking sheet to make sure it will fit.


Then the layering begins.  I begin with the deli ham (left) followed by the pepperoni (right).


Then I add the diced onion and bell pepper (left) and drizzle on some pizza sauce (right).


The next layer is some sliced mozzarella cheese (left), followed by some bologna (right).
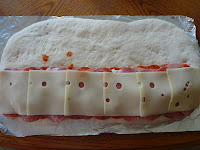
Then I add a layer of sliced dry salami (left), followed by a layer of sliced Swiss cheese (right).


Then, I add a some basil, oregano, and garlic powder on top of the cheese (left).  Instead of drizzling more pizza sauce on top of this, I spread it on the "top" portion of the bread to make sure it's evenly distributed in each bite (right).


This is where working on the non-stick foil is helpful.  The next step is to pull the "top" side of the bread over the filling, being careful to not cause any holes to form in the dough.


Then I pinch the dough together with the "bottom" portion of the dough to seal it shut.


I fold up the sides of the foil to create sides in case I didn't do a superior job of sealing the bread on the last step and some juices escape.  As you can see, it doesn't quite fit on my baking pan, even at an angle, so I don't want any juices dripping on the bottom of the oven and making a mess!  Also, having it on the foil makes it easier to transfer it to the baking sheet and it can be repositioned easily this way. 


While the Stromboli is in the oven, I prepare my cooling area.  I'm always making this sandwich in the morning of the day we leave for our beach trip and I can't pack up the Stromboli until it is completely cool, so I raise my cooling rack on some inverted cups allowing for more air circulation around the sandwich so it cools more quickly.  This sandwich is pretty dense, so it takes some time to cool completely.


The house smells so good as this is cooking!  When it comes out of the oven it is a beautiful golden brown.  I put it on the cooling rack for a minute while still on the baking sheet.


Then I brush a little bit of butter on top and take it off the baking sheet.  After about 5 minutes, I unfold one side of the foil and because of it's non-stick surface, it's easy to just slide the Stromboli off the foil onto the cooling rack to cool completely.

I cool this sandwich down to pack for our trip, but it can also be served warm with a little extra pizza sauce that has been heated for dipping.  I've done this before for a party and it's excellent served that way also.  Either way, this sandwich is a real treat and worth the time it takes to put it together.  Everyone who's ever tasted it can agree on that!  Enjoy!


Stromboli

2 loaves (1-lb. each) frozen bread dough, thawed*
flour for rolling out dough
¼ pound sliced ham
¼ pound sliced pepperoni
¼ cup chopped onion
¼ cup chopped green bell pepper
14 oz jar pizza sauce, divided
¼ pound sliced mozzarella cheese
¼ pound sliced bologna
¼ pound sliced dry salami
¼ pound sliced Swiss cheese
1 teaspoon dried basil
1 teaspoon dried oregano
½ teaspoon garlic powder
¼ teaspoon pepper
2 tablespoons butter, melted

Place the bread dough in a large bowl to thaw.  It will take several hours for this to occur.  After it is thawed, let it rise in a warm place until doubled.  Punch down dough and place on a lightly floured work surface.  Roll loaves together into one 15-in. x 12-in. rectangle.  This will be the hardest step of the whole process as the dough has elasticity you will be dealing with.  As you prepare to add all of the meats and cheeses, keep in mind that you will be placing them along the long side of this rectangle on half of the dough and the other half will be folded over on top of these filling items before baking.  Make sure you leave ¼-in. edge for pinching the two sides together.  Now begin layering, starting with the ham and pepperoni.  Sprinkle with onion and green pepper.   Drizzle with ¼ cup of pizza sauce.  Layer mozzarella, bologna, salami and Swiss cheese over sauce layer.  Sprinkle with basil, oregano, garlic powder and pepper.  Spread the remaining ¼ cup of pizza sauce on the lid or top side of the bread.  Fold this side of the bread over the filling and seal edges well.  Place on a greased 15-in. x 10-in. baking pan.  Bake at 375° for 30-35 minutes or until golden brown.  Remove from oven and brush with melted butter.  Heat the remaining pizza sauce for dipping and serve with sliced Stromboli.  Enjoy!

*I use Bridgeford brand frozen bread dough

Chicken-Bacon-Ranch Wraps

On a hot day, if you ever need to have something cool or cold to eat that you've prepared ahead of time, then this recipe is for you.    I've found this to be a favorite choice of sandwich at home on those days when everyone has a different schedule and we won't be eating dinner together or for our second day on our beach trip.  I prepare the filling and keep it in Tupperware until it gets wrapped in a tortilla with a bit of lettuce.  Hint:  If taking this dish in a cooler, store it in a piece of Tupperware with a round seal.  All Tupperware is guaranteed to be air-tight, but the containers with round seals are guaranteed to be liquid tight!  That way as the ice melts in your cooler, none of the water will get into your food.


I like using the rotisserie chickens in different dishes because the combination of dark and white meat tends to give more flavor and the smoky goodness of the bacon just adds that extra touch to this recipe.  My guys and everyone else I have served this to, give it 8's and 9's when rating it.  I also love how easy it is to serve when my guys are ready to eat.


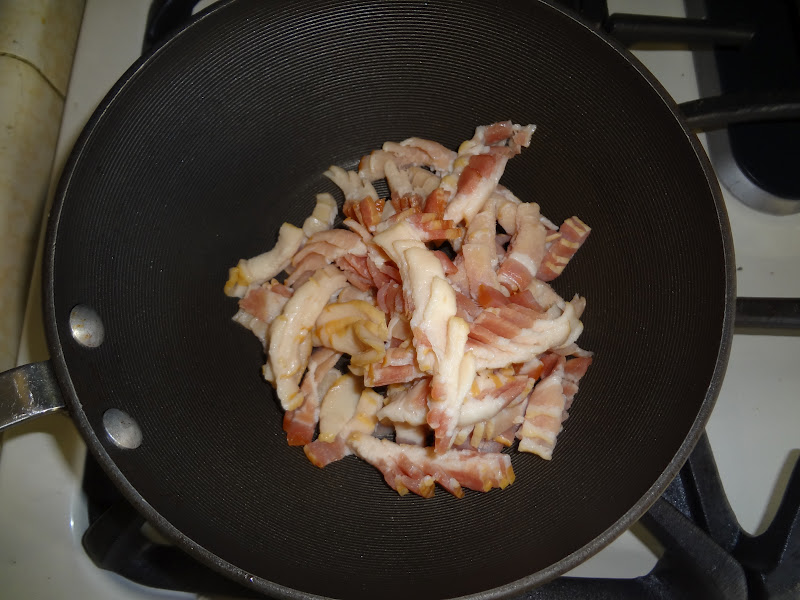
As it take a while to cook, I begin by cooking the bacon.  When a recipe calls for crumbled bacon, I like to cut the raw bacon into 1/2-inch pieces and throw them into a saucepan to cook.  This way the pieces are more uniform in size and they seem to cook faster without running the risk of overcooking.


In the first photo, you can see how the pieces are still clumped together as I cut them, but in the photo above, you can see that as they cook and I stir them occasionally, the pieces break apart nicely.


Once the bacon is fully cooked, I remove the pieces to a paper towel to soak up any extra fat.  I line a small bowl with foil and pour the bacon grease from the pan into it.  This way, when it hardens, I can remove it in the foil and throw it away and I don't even have to wash the bowl!


I like to always have on hand the meat of a rotisserie chicken.  I usually buy one every time I go to Costco, let it sit on the counter to cool for an hour or so, then remove the skin and take the meat off the bones.  I then freeze it in a zip lock bag.  This way, whenever I have a dish I want to make using a rotisserie chicken, all I have to do is defrost the chicken and I'm ready to use it.  For this dish, I placed the chicken in a large bowl and added the green onions, tossing to combine.


I then shredded the Monterey Jack cheese and added it to the chicken and onions, tossing to combine.


By that time, the bacon was cool enough to add to the chicken mixture.  Again, I tossed to combine.


The Ranch dressing was the last ingredient to be added.  I'm not a huge fan of Ranch dressing, so the first time I made this dish I only added enough dressing to coat the other ingredients.  It really lacked flavor, so I kept adding more dressing until it tasted good.  The second time I made it, I used the cup of dressing the recipe called for and that was perfect.  It wasn't dry and it was flavorful, but didn't scream Ranch dressing.


That's all there is to it.  It's ready to be placed in a flour tortilla with a bit of lettuce!  On the beach, each person takes a tortilla, places it in their hand and I scoop some of the chicken mixture on to each one.  The recipe had a tip that it can also be heated in the microwave on high for 30 to 45 seconds after being placed on the tortilla, but we've only eaten it cold.  It's a refreshing cold sandwich on a hot day!  Enjoy!

Chicken-Bacon-Ranch Wraps
  
1 rotisserie chicken, coarsely shredded
1 1/2 cups shredded Monterey Jack cheese (6 oz.)
8 slices cooked bacon, chopped (about ½ cup)
1/3 cup chopped green onions
1 cup Ranch dressing
1 pkg. flour tortillas, soft taco size
shredded lettuce, optional

In a large bowl, gently mix all ingredients except tortillas and lettuce.   To assemble sandwich, place approx. 1/3 cup of chicken mixture in the middle of one tortilla, add lettuce to your liking.  Roll up burrito style and enjoy.

The chicken mixture can be kept in the refrigerator for quick snacks for the kids.

Chocolate Chip Dream Bars

This cookie recipe is one of my favorites.  Not only do I like how these bars taste, but I like how easy they are to put together.


I made this recipe last week to take on our annual beach trip, where they were such a hit on the first day, that I wasn't sure we'd have any left for the second day!  Unfortunately, as I was cutting these bars to pack for the trip, I forgot to take a picture of the final product.  The picture above doesn't convey how yummy these cookies are, I'm sorry.  I don't know where I found this recipe, as the original disappeared, but I had typed it up on the computer for a friend, so I still had a copy.


To make the crust, I put the softened butter (see my post for Chewy Chocolate Cookies for what to do if you forget to leave out your butter to soften) and brown sugar in a medium bowl.


I don't even get out my hand mixer for this, I just use my Pampered Chef rubber spatula to combine the two ingredients.


Using the spatula, I then work in the flour.


When fully incorporated, the mixture almost looks like moist sand.


This mixture gets pressed into the bottom of an ungreased 9x13-inch pan and baked for 10 minutes.


In the meantime, in a medium bowl, using a hand mixer, I combine the brown sugar, eggs and vanilla.


To this mixture I add the chocolate chips, stirring until combined.  I have to pay attention while doing this because I need to add all of the semi-sweet chocolate chips, but only 1 cup of the milk chocolate chips, as I need to save 3/4 cup of them for the top.  There was one time I wasn't paying attention and put all of the milk chocolate chips in at this step and the bars didn't come out quite right, plus I was afraid I wouldn't have enough for the top.


This mixture gets poured on top of the crust and it goes back into the oven.


Once out of the oven, it looks almost as if I've baked a batch of chocolate chip cookies in a baking pan.     This needs to cool completely before adding the topping.


For the topping, in a small saucepan I melt the remaining milk chocolate chips with the vegetable oil over low heat, stirring constantly. 


The chocolate mixture can then be drizzled on top of the bars (either before or after cutting them), or as I did in this case, spread in a thin layer on top of the bars before cutting them.  I chose to do it this way because it was faster and I didn't want any of the chocolate drizzles to get knocked off during the trip to the beach.  The drizzle looks best, so the next time I make these bars, I'll try to remember to take a picture and add it here.  No matter what they look like, they are scrumptious!  Enjoy!


Chocolate Chip Dream Bars
  
½ cup packed dark brown sugar
1/3 cup butter or margarine, softened
1 cup all-purpose flour
2 eggs
1 cup packed dark brown sugar
1 teaspoon vanilla
2 tablespoons all-purpose flour
1 teaspoon baking powder
½ teaspoon salt
1 bag (6 oz.) semisweet chocolate chips (1 cup)
1 ¾ cups milk chocolate chips (divided)
2 teaspoons vegetable oil

Heat oven to 350°F.  In medium bowl, mix ½ cup brown sugar and the butter.  Stir in 1 cup flour.  Press in ungreased 13x9-inch pan.  Bake 10 minutes.

Meanwhile, in medium bowl, mix eggs, 1 cup brown sugar and the vanilla. Stir in 2 tablespoons flour, the baking powder and salt.  Stir in semisweet chocolate chips and 1 cup of the milk chocolate chips.  Spread over hot crust.

Bake 15 to 20 minutes or until golden brown.  Cool completely in pan on wire rack, about 30 minutes.

In 1-quart saucepan, heat remaining ¾ cup milk chocolate chips and the oil over low heat, stirring constantly, until chocolate is melted; drizzle glaze over bars.  Refrigerate at least 1 hour until firm.  Cut into bars and store at room temperature.