Showing posts with label Beach Trip. Show all posts

Monday, August 13, 2012

Mexicorn Dip

This was a new recipe I tried for our annual beach trip this year and it was a huge hit.  As I was making it, I thought the amount was so great that I'd be bringing some home for sure, but every drop disappeared on the beach!


Everyone who tried this dip raved about it.  My youngest son brought a friend with him this year and I discovered that he is a vegetarian the first day of our trip.  I hadn't prepared anything specifically for him to eat, so I was glad I had made this dip, which he loved!  I found this recipe on Pinterest but it originated on tastykitchen.com.


In a large bowl, I combined the mexicorn, diced green chilies, diced bell pepper and diced jalapenos.  The recipe also calls for diced green onions, but I chose to bring them to the beach separately and add them just before serving, as I was afraid they may get wilted if I added them the day before serving this dip.


After shredding the cheese, I added it to the vegetable mixture.


Then I added the sour cream and mayonnaise.  I used a Tupperware bowl, because in addition to being airtight like all Tupperware is guaranteed to be, any container with a round seal is also guaranteed to liquid tight.  It's insurance that as the ice melts in my cooler, no water will get into my Tupperware bowl!  As the recipe suggested, I served this dip with Frito's Scoops.  Enjoy!


Mexicorn Dip

2 cans (11 oz. each) Mexicorn, drained
1 can (4 oz.) diced green chilies
1 whole bell pepper, diced
3 whole green onions, chopped
2 jalapenos, diced (remove seeds)
8 ounces sharp cheddar cheese, shredded
1 cup sour cream
1 cup mayonnaise

Mix all together; refrigerate until serving with Frito's Scoops.

Chicken-Bacon-Ranch Wraps

On a hot day, if you ever need to have something cool or cold to eat that you've prepared ahead of time, then this recipe is for you.    I've found this to be a favorite choice of sandwich at home on those days when everyone has a different schedule and we won't be eating dinner together or for our second day on our beach trip.  I prepare the filling and keep it in Tupperware until it gets wrapped in a tortilla with a bit of lettuce.  Hint:  If taking this dish in a cooler, store it in a piece of Tupperware with a round seal.  All Tupperware is guaranteed to be air-tight, but the containers with round seals are guaranteed to be liquid tight!  That way as the ice melts in your cooler, none of the water will get into your food.


I like using the rotisserie chickens in different dishes because the combination of dark and white meat tends to give more flavor and the smoky goodness of the bacon just adds that extra touch to this recipe.  My guys and everyone else I have served this to, give it 8's and 9's when rating it.  I also love how easy it is to serve when my guys are ready to eat.


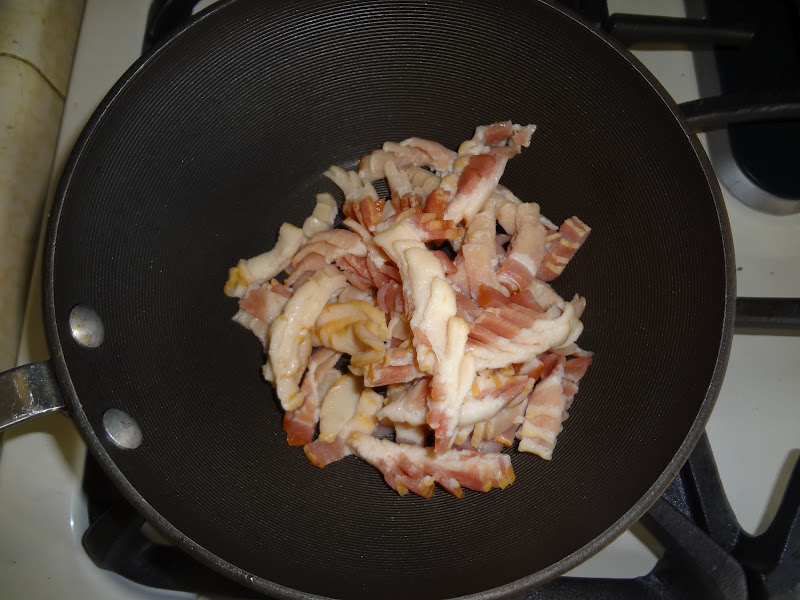
As it take a while to cook, I begin by cooking the bacon.  When a recipe calls for crumbled bacon, I like to cut the raw bacon into 1/2-inch pieces and throw them into a saucepan to cook.  This way the pieces are more uniform in size and they seem to cook faster without running the risk of overcooking.


In the first photo, you can see how the pieces are still clumped together as I cut them, but in the photo above, you can see that as they cook and I stir them occasionally, the pieces break apart nicely.


Once the bacon is fully cooked, I remove the pieces to a paper towel to soak up any extra fat.  I line a small bowl with foil and pour the bacon grease from the pan into it.  This way, when it hardens, I can remove it in the foil and throw it away and I don't even have to wash the bowl!


I like to always have on hand the meat of a rotisserie chicken.  I usually buy one every time I go to Costco, let it sit on the counter to cool for an hour or so, then remove the skin and take the meat off the bones.  I then freeze it in a zip lock bag.  This way, whenever I have a dish I want to make using a rotisserie chicken, all I have to do is defrost the chicken and I'm ready to use it.  For this dish, I placed the chicken in a large bowl and added the green onions, tossing to combine.


I then shredded the Monterey Jack cheese and added it to the chicken and onions, tossing to combine.


By that time, the bacon was cool enough to add to the chicken mixture.  Again, I tossed to combine.


The Ranch dressing was the last ingredient to be added.  I'm not a huge fan of Ranch dressing, so the first time I made this dish I only added enough dressing to coat the other ingredients.  It really lacked flavor, so I kept adding more dressing until it tasted good.  The second time I made it, I used the cup of dressing the recipe called for and that was perfect.  It wasn't dry and it was flavorful, but didn't scream Ranch dressing.


That's all there is to it.  It's ready to be placed in a flour tortilla with a bit of lettuce!  On the beach, each person takes a tortilla, places it in their hand and I scoop some of the chicken mixture on to each one.  The recipe had a tip that it can also be heated in the microwave on high for 30 to 45 seconds after being placed on the tortilla, but we've only eaten it cold.  It's a refreshing cold sandwich on a hot day!  Enjoy!


Chicken-Bacon-Ranch Wraps
  
1 rotisserie chicken, coarsely shredded
1 1/2 cups shredded Monterey Jack cheese (6 oz.)
8 slices cooked bacon, chopped (about ½ cup)
1/3 cup chopped green onions
1 cup Ranch dressing
1 pkg. flour tortillas, soft taco size
shredded lettuce, optional

In a large bowl, gently mix all ingredients except tortillas and lettuce.   To assemble sandwich, place approx. 1/3 cup of chicken mixture in the middle of one tortilla, add lettuce to your liking.  Roll up burrito style and enjoy.

The chicken mixture can be kept in the refrigerator for quick snacks for the kids.

Chocolate Chip Dream Bars

This cookie recipe is one of my favorites.  Not only do I like how these bars taste, but I like how easy they are to put together.


I made this recipe last week to take on our annual beach trip, where they were such a hit on the first day, that I wasn't sure we'd have any left for the second day!  Unfortunately, as I was cutting these bars to pack for the trip, I forgot to take a picture of the final product.  The picture above doesn't convey how yummy these cookies are, I'm sorry.  I don't know where I found this recipe, as the original disappeared, but I had typed it up on the computer for a friend, so I still had a copy.


To make the crust, I put the softened butter (see my post for Chewy Chocolate Cookies for what to do if you forget to leave out your butter to soften) and brown sugar in a medium bowl.


I don't even get out my hand mixer for this, I just use my Pampered Chef rubber spatula to combine the two ingredients.


Using the spatula, I then work in the flour.


When fully incorporated, the mixture almost looks like moist sand.


This mixture gets pressed into the bottom of an ungreased 9x13-inch pan and baked for 10 minutes.


In the meantime, in a medium bowl, using a hand mixer, I combine the brown sugar, eggs and vanilla.


To this mixture I add the chocolate chips, stirring until combined.  I have to pay attention while doing this because I need to add all of the semi-sweet chocolate chips, but only 1 cup of the milk chocolate chips, as I need to save 3/4 cup of them for the top.  There was one time I wasn't paying attention and put all of the milk chocolate chips in at this step and the bars didn't come out quite right, plus I was afraid I wouldn't have enough for the top.


This mixture gets poured on top of the crust and it goes back into the oven.


Once out of the oven, it looks almost as if I've baked a batch of chocolate chip cookies in a baking pan.     This needs to cool completely before adding the topping.


For the topping, in a small saucepan I melt the remaining milk chocolate chips with the vegetable oil over low heat, stirring constantly. 


The chocolate mixture can then be drizzled on top of the bars (either before or after cutting them), or as I did in this case, spread in a thin layer on top of the bars before cutting them.  I chose to do it this way because it was faster and I didn't want any of the chocolate drizzles to get knocked off during the trip to the beach.  The drizzle looks best, so the next time I make these bars, I'll try to remember to take a picture and add it here.  No matter what they look like, they are scrumptious!  Enjoy!


Chocolate Chip Dream Bars
  
½ cup packed dark brown sugar
1/3 cup butter or margarine, softened
1 cup all-purpose flour
2 eggs
1 cup packed dark brown sugar
1 teaspoon vanilla
2 tablespoons all-purpose flour
1 teaspoon baking powder
½ teaspoon salt
1 bag (6 oz.) semisweet chocolate chips (1 cup)
1 ¾ cups milk chocolate chips (divided)
2 teaspoons vegetable oil

Heat oven to 350°F.  In medium bowl, mix ½ cup brown sugar and the butter.  Stir in 1 cup flour.  Press in ungreased 13x9-inch pan.  Bake 10 minutes.

Meanwhile, in medium bowl, mix eggs, 1 cup brown sugar and the vanilla. Stir in 2 tablespoons flour, the baking powder and salt.  Stir in semisweet chocolate chips and 1 cup of the milk chocolate chips.  Spread over hot crust.

Bake 15 to 20 minutes or until golden brown.  Cool completely in pan on wire rack, about 30 minutes.

In 1-quart saucepan, heat remaining ¾ cup milk chocolate chips and the oil over low heat, stirring constantly, until chocolate is melted; drizzle glaze over bars.  Refrigerate at least 1 hour until firm.  Cut into bars and store at room temperature.

Chewy Chocolate Cookies

This cookie recipe is a favorite of my boys.  The cookie doesn't look like much because it's small and on the flat side, but it's slightly crisp on the outside and the inside is soft and chewy.  Because of that, I used to call them brownie cookies.  I like to put one on my tongue and let it melt before chewing.  


I found this recipe at the bottom of an ad for Hershey's Cocoa and have been making these cookies for at least 15 years.  I just made a batch to take on our annual beach trip, and when my boys discovered them, they both exclaimed to everyone how much they love these cookies.  Needless to say, they all disappeared!


To begin, the butter must be softened to room temperature.  Whenever I forget to do this, I put one stick of butter at time in the microwave and run it on high for 5 seconds.    I wait a couple of minutes and run it again on high for 5 seconds.  I check it to see if it has a little "give" when I squeeze it.  If it does, I remove it from the microwave and put it in my mixer bowl.  If it doesn't, I give it another 5 seconds on high in the microwave.  Any more time than that, and the butter will begin to melt.  I then start the mixer with only the butter in the bowl.  As it gets broken up by the beater, it is able to soften more quickly.  I don't add the sugar until the butter alone is soft and creamy.  Another idea, which I haven't tried yet, is to grate the cold butter using a cheese grater; the smaller pieces of butter will warm up more quickly than the entire stick!  Once the butter is soft, I beat it together with the sugar until creamy.


Then, I add the eggs one at a time, beating until fully incorporated after each egg.  I always turn off the beater when adding each egg, just in case a small piece of the shell sneaks in so I can easily remove it.  Hint:  To check for the freshness of an egg, I drop the whole egg (still in the shell) in a glass of water.  If it sinks, it's fresh, but if it floats to the top, it's rotten and I throw it away. 


I add the vanilla and beat again until thoroughly mixed in.


In the meantime, in a medium bowl, I combine the flour, cocoa, baking soda and salt.


I add this mixture gradually to the butter mixture in the mixing bowl.  It gets mixed in more easily if I add it a little at a time and it keeps me from getting a cloud of the flour mixture thrown back in my face!


This is a very soft cookie dough, which is a light shade of brown.


Because the dough is soft, it spreads quite a bit when baking, so I leave about 2 inches between each cookie.  The recipe says to drop the dough by teaspoonfuls onto the cookie sheet, but I prefer to use my Pampered Chef small scoop.  I find it faster and the cookies are more round and uniform in size this way.  


Into the oven they go for 9 minutes.  The cookies may not appear done after that amount of time, but they really are.  If you leave them in any longer than that, they may not be soft and chewy.  The picture above shows how they puff while baking and the picture below shows how they flatten while cooling.  


Because they are so soft, they need to remain on the cookie sheet for about 1 minute before removing them to a cooling rack.  They will fall apart if you try to move them too soon.  By the way, a couple of months ago, I got a new range with a convection oven!  I am so excited, as I had my previous range for over 26 years!  When reading the manual about how to operate the convection oven feature, it was advised to use cookies sheets with low or no sides when baking cookies as they worked best.  I went shopping almost immediately and found these Calphalon 12" x 17" baking sheets, which are non-stick.  What an amazing product!  The non-stick feature works so well that as I was moving one cookie sheet full of cookies, I knocked it slightly and the cookies all started moving toward one end.  If these cookies weren't so soft, I probably would have been able to lift them directly off the cookie sheet with my fingers instead of using a spatula!

These yummy chocolate cookies are so addictive you can't eat just one!  Enjoy!


Chewy Chocolate Cookies
  
1 ¼ cups (2 ½ sticks) butter, softened
2 cups sugar
2 eggs
2 teaspoons vanilla
2 cups unsifted all-purpose flour
¾ cup cocoa
1 teaspoon baking soda
½ teaspoon salt

Preheat oven to 350°F.  Cream butter and sugar in large mixer bowl.  Add eggs and vanilla; blend well.  In a separate bowl, combine flour, cocoa, baking soda and salt; add to creamed mixture gradually, blending well.  Drop by teaspoonfuls onto ungreased cookie sheet.  Bake at 350°F for 9 minutes.  (Do not overbake.  Cookies will be soft.  They will puff during baking and flatten upon cooling.) Cool on cookie sheet until set, about 1 minute; remove to wire rack to cool completely.

Yield:  Approximately 6 dozen

Thursday, August 9, 2012

No-Bake After-Dinner Mint Bars

If you like chocolate and mint together, this recipe is for you!  I'm a huge chocolate mint lover and this has got to be the best recipe I've ever found.  There are 3 layers and there is mint flavoring in each layer!  I make these each year for our annual beach trip to munch on after dinner while we play dominoes late into the night.  They are so popular, I started making a double batch a couple of years ago otherwise there wouldn't be any for the second night!


I found this recipe in one of those little recipe books that are sold at the checkstand at the market.  My husband doesn't care for mint (that means more for the rest of us!), but my boys give this recipe 9's on the Melnarik rating scale.  I give this recipe a 10!  These scrumptious mints are easy to make, but they require refrigeration time between steps, so you need to allow for that.


The first step is to crush the chocolate wafer cookies.  Oreos do not work for this recipe.  They need to be chocolate wafers with no cream filling.  I use the kind that can be found near the ice cream cones and toppings in the market.  To crush them finely, I use my mini food processor, which has the job done in less than a minute.  If you don't have one, they can be placed in a zip lock bag and crushed with a rolling pin or mallet.  Just make sure the crumbs are very fine.


The recipe calls for mint-flavored semi-sweet chocolate chips.  Where I live, the markets only carry that product between Thanksgiving and Christmas.  That's not helpful if you want to make these mints any other time of year.  Then I discovered this product - The Andes Creme de Menthe baking chips.  I actually prefer this over the mint chocolate chips because the pieces are smaller so they melt faster and the green portion seems to melt better than that found in the swirled chocolate chips.  Either will work, I just prefer these.


In a medium saucepan, I melt the butter with 1/4 cup of the mint chips, stirring until smooth.


I remove the pan from the heat and add the wafer crumbs.  When they're mixed together, it looks like moist dirt.  Then I press this mixture into an 8- by 8-inch pan (sorry, no picture).  The pan gets put into the refrigerator for at least 15 minutes.  If the butter doesn't get hard enough, it will be very hard to spread the next layer on top - believe me, I learned the hard way!


For the second layer, I place the softened butter and powdered sugar in a bowl.


Using a hand mixer, I combine the butter and sugar until it makes fine crumbs.  This helps ensure a smooth texture once I add the liquids.


Then I beat in 1 tablespoon of milk, 1/2 teaspoon of peppermint extract, and 1 drop of green food color.  I guess the food color could be omitted, but most people expect mint candy to be green!  It ends up being a pretty shade of (what else?) mint green!


After removing the pan from the refrigerator, I spread the powdered sugar mixture on top of the crumb base.  I use an off-set cake decorator's spatula to help make it as smooth as possible into the corners.  It doesn't have to be perfectly smooth, because it won't be seen, but it will help make the top layer look more even when the bars are cut.  Back into the refrigerator is goes for another 15 minutes to let this layer stiffen up a bit.


The last layer is made by melting 1/3 cup butter with the remaining mint chips from the bag in a small saucepan (sorry, no photo), stirring constantly until the chips are completely melted and smooth.  The pan is brought back from the refrigerator and the hot mint chocolate is poured directly on top of the second layer.


The liquid chocolate pretty much runs to the sides, but I have to help it get into the corners a little with a spatula.  Back into the refrigerator to cool completely.  This will take at least an hour.  I usually make these a day ahead, so I'm sure they are completely set.


You'd think that they are ready to cut as soon as they come back out of the refrigerator, but I've found that if I give them about 1/2 hour on the counter, they cut more easily without causing breakage, thereby making final product look better.  I begin by scoring the top of the chocolate.


Then, my knife has a guide to follow and I make two more passes on each line to cut through the top layer of chocolate.  I'm really trying to avoid breaking that top layer!  Then I cut all the way through to the bottom.  You'd think that then they can be removed from the pan easily, but I've found that by letting them warm up a bit, the bottom layer is not quite as "solid" so there can be some left behind when removing them from the pan, especially with the first couple of pieces.  To avoid this, after cutting the bars, I put the pan back into the refrigerator again for about 1/2 hr.


Now, they're ready to remove from the pan and savor!   If I'm serving these mints for something special, I will "clean up" the crumbs from the top, so they look better, but in this case, they're going to the beach where nobody cares what they look like, they just want to put them in their mouths.  I hope the pretty plate made them look better here!  My only other suggestion is to serve them cold.  Once they warm up a bit, they get more messy to eat.  Any way you serve them, these will be the best chocolate mints you've ever tasted!  Enjoy!


 No-Bake After-Dinner Mint Bars

½ cup butter
1 (10 oz.) pkg. mint-flavored semi-sweet chocolate chips*
2 cups chocolate wafer cookie crumbs**
¼ cup butter, softened
1 tablespoon milk
½ teaspoon peppermint extract
½ teaspoon vanilla
1 drop green food color
2 cups powdered sugar
1/3 cup butter

Lightly grease an 8- or 9-inch square pan.  In a medium saucepan, combine ½ cup better and ¼ cup of the chocolate chips.  Cook over low heat until melted, stirring constantly.  Remove from heat; stir in cookie crumbs until well moistened.  Press crumb mixture evenly in greased pan.  Refrigerate 15 minutes until firm.

Meanwhile in a small bowl, beat butter adding powdered sugar gradually.  Add extract and vanilla and food color.  Spread evenly over crumb mixture and refrigerate another 15 minutes.

In a small saucepan, melt remaining chocolate chips and 1/3 cup butter over low heat, stirring constantly.  Spread evenly over bars.  Refrigerate 10 to 15 minutes.  Score the top with a knife to make cutting more easy.  Return to refrigerator for at least 1 hour before cutting and serving.  I find these are best if served cold straight from the refrigerator.


*I use the Andes mint chips
**I find these in the ice cream toppings section of my market


Wednesday, August 8, 2012

Apple Raisin Muffins and Cinnamon Butter

When we were invited with a group of friends to spend the weekend at the home of friends who had moved away, we each took a meal that we were in charge of.  I got breakfast on the Sunday morning.  I  thought a lot about what I could make that was great, but didn't take much time to prepare or clean up from because we were all going to church afterward.  I finally decided on these mini muffins because all the work was done at home!  They were a huge hit that weekend and as the same group of friends attends our annual beach trip weekend, I now make these muffins each year to take along.


I originally saw Paula Deen make these muffins on one of her shows, so I went on line to get the recipe.  On the show, she ate them plain and they're terrific that way, but I "Paula Deen" them by serving them with homemade cinnamon butter (recipe included below)!  The cinnamon butter can be used straight from the refrigerator if it is being applied to something hot like toast, but for use on these muffins, I bring it to room temperature before using it.  The only down side to this recipe is that you have to have plenty of time to prepare them.  The prep time in itself isn't long, but there are 2 steps in the process with a lot of cooling time needed in between!  Don't get me wrong -- the time investment is totally worth it!


The first step is to grate the apples.  I give them a good wash and then grate them with the peel on.  I have found it easiest to grate around the apple first to get through the peel, then grate it vertically the rest of the way.


As you can see from the photo above, I grate it right down to the core.  Usually, 2 medium apples yield the 2 cups needed for this recipe.


The easiest way to grate nutmeg, I've found is to use my microplane.  Holding the handle, I rest the tip on my surface and run the nutmeg along the side until I get the amount I need.  It's a very handy kitchen tool that can also be used to zest lemons, limes and oranges or grate ginger or parmesan cheese!


In a large saucepan, I place the butter, sugar, raisins, apples, cinnamon, nutmeg and cloves.  Don't worry if the apples have begun to darken, they are perfectly fine and they won't even be distinguishable by the time this mixture is cooked!  I turn the heat on high and once the butter begins to melt, I can stir the ingredients to combine them.  


Once this mixture begins to boil, I turn off the heat and remove the pan to let it cool.  This is when the waiting begins.  Depending on the time of year and how warm it is in your kitchen, this could take hours!  I usually do this part in the morning, so I can bake the muffins in the afternoon.  The mixture does need to cool completely before the next step.


I use muffin tin liners in my mini muffin pan, but if I'm out, the tin can also be greased.  One friend is allergic to nuts, so I use different liners for 6 of them to distinguish the nut-free muffins just for him!


In a large bowl, I combine the flour and baking soda.  Then I add the cooled apple and raisin mixture.


This makes a fairly stiff dough.


Using my Pampered Chef medium scoop, I fill the 6 liners with the nut-free dough.


Then I add in the pecans and mix to combine.  I fill the rest of the muffin tin and it's ready to go into the oven.  Of course, the nuts can be added before the apple/raisin mixture if you don't have any nut allergies to worry about.


These muffins don't rise much, so they should be filled to the top.  Using the scoop, it looks as though the dough comes above the top of the tin, but this amount is perfect.


You can see in the photo above, that they rise a bit and are a perfect golden brown when they come out of the oven.  I let them cool a couple of minutes before removing them from the pan to a wire rack to cool completely.  I store them in Tupperware with wax paper separating the layers when taking them to the beach.  This recipe makes 5 dozen, so if you don't plan to use them all at once, they freeze very well.


We love to eat these tasty little treats at breakfast time and they are especially good warm (they can be heated in the microwave), and they're great as a snack, but we're used to having them on our beach trip weekend as we visit with very good, long-time friends!  Enjoy!


Apple Raisin Muffins

1 cup water
2 cups sugar
2 cups grated apples
2 cups raisins
1 cup (2 sticks) butter
2 teaspoons ground cinnamon
2 teaspoons freshly grated nutmeg
½ teaspoon ground cloves
1 cup chopped pecans
2 teaspoons baking soda
3 ½ cups all-purpose flour

Combine the water, sugar, apples, raisins, butter, cinnamon, nutmeg, and cloves in a large saucepan; bring to a boil.  Remove the pan from the heat and cool completely.

Preheat the oven to 350°F.  In a large bowl, stir the baking soda and nuts into the flour.  Add the cooled mixture to the bowl and stir until blended.  Grease miniature muffin tins or line with paper liners.  Fill muffin tins with batter to the top.  Bake for 15 minutes at 350°F.  These muffins are great served warm or at room temperature and they freeze well.

Cinnamon Butter

1/2 cup (1 stick) butter at room temperature
1 cup powdered sugar
1 1/2 heaping teaspoons ground cinnamon

In a medium bowl, cream together butter and sugar.  Add cinnamon; combine thoroughly.  Store in refrigerator.