Showing posts with label Cookies. Show all posts

Thursday, August 15, 2013

Salted Peanut Chews

I know the trend right now is to make things with salted caramel.  I personally love the combination of salty and sweet.  These bars satisfy that need when my tastebuds cry out for it.  They aren't quite as salty as the salted caramel goodies I've tried, but they're pretty addictive for me.  I hadn't made these in some time and decided to resurrect the recipe for our recent beach trip, as I used to make them all the time for our annual seaside trip and thought the 20th anniversary would be the perfect time to do so.


I found this recipe years ago in one of those small recipe magazines found near the checkout stand in the grocery store.  I can't even find the original recipe to give credit for where it came from; all I have is the paper I typed to share the recipe with friends.  Like me, my youngest son thinks these bars are addicting and overall the guys rate these bars 7's and 8's.


After preheating the oven to 350°F, I began by combining the flour, brown sugar, baking powder, salt, and baking soda in a large mixing bowl.


Then I added the softened butter, beating to thoroughly combine.


Next, I add the wet ingredients, including two egg yolks.  Helpful Hint:  I always drop any egg I'm about to use in a short glass of water to make sure it is fresh.  If it sinks, it is perfectly fresh.  If it floats, throw it out immediately!  Try not to break it, as it would smell foul!  The reason the bad eggs float is because as they spoil, the air pocket just inside the shell becomes a gas, which is lighter than air and causes the egg to float.


Now I want to show you the fastest and most amazing way to separate eggs!  I found a video showing this method on Pinterest and couldn't believe my eyes.  I've captured the process here in still shots for you.  First, I cracked a fresh egg into a saucer.  Then, taking an empty, clean water bottle, I squeezed the sides of the bottle as I neared the yolk.


As I touched the yolk gently with the lip of the bottle, I released the squeeze on the bottle and the yolk began to travel inside the bottle!


Once the yolk was fully inside the bottle, I lifted it away from the white and had a perfect separated egg.  I keep washing the same small water bottle, as it is my new egg separator!


I simply squeezed the bottle again over the mixing bowl to release the egg yolk and repeated the process for the second egg.  It only takes a matter of seconds to separate an egg.  I also added the vanilla here and beat the ingredients together.


The result is a moist, crumbly mixture.


Using my clean hands, I pressed this crust mixture into my 9- x 13-inch baking dish and put it in the oven for 15 minutes.


As you can see, the crust became a pretty golden brown and raised a little bit.


Once out of the oven I added the marshmallows.  My marshmallows got a little sticky because of the hot weather, which makes it harder to make an even layer, but I did the best I could.  I placed the dish back in the oven for another 2 minutes.


The marshmallows puffed up and almost completely covered the crust in this step.  When the peanut mixture is added, it helps move the marshmallow around, so each bar has some marshmallow.


I apologize, my pictures of the next step are missing.  Basically, in a large saucepan, I combined the corn syrup, butter, vanilla, and peanut butter chips.  I cooked this mixture over medium heat, stirring constantly until the chips were melted and the mixture was smooth.  I then removed the pan from the heat and added the peanuts and rice cereal.  This is a stiff mixture to stir, but everything needs to be combined thoroughly.  I then used a soup spoon to drop this mixture as evenly as possible over the marshmallows.  I then refrigerated the dish for 1 hour until firm, then cut them into 1- by 2-inch bars.


To me, this is just the right combination of salty and sweet.  Enjoy!


Salted Peanut Chews

CRUST                                                                     TOPPING
  1 ½   cups all-purpose flour                                   2/3   cup corn syrup
   2/3   cup firmly packed brown sugar                   1/4   cup butter
   1/2   teaspoon baking powder                                  2   teaspoons vanilla
   1/2   teaspoon salt                                                      1   (10 oz.) pkg. peanut butter chips
   1/4   teaspoon baking soda                                       2   cups crisp rice cereal
   1/2   cup butter, softened                                          2   cups salted peanuts
       1   teaspoon vanilla
       2   egg yolks
       3   cups miniature marshmallows

Heat oven to 350°F.  Lightly spoon flour into measuring cup; level off.  In a large bowl, combine all crust ingredients except marshmallows at low speed until crumbly.  Press firmly in bottom of ungreased 9- x 13-inch baking pan.

Bake at 350°F for 12 to 15 minutes or until light golden brown.  Remove from oven; immediately sprinkle evenly with marshmallows.  Return to oven; bake an additional 1 to 2 minutes or until marshmallows just begin to puff.  Cool while preparing topping.


In large saucepan, combine all topping ingredients except cereal and peanuts.  Heat just until chips are melted and mixture is smooth, stirring constantly.  Remove from heat; stir in cereal and peanuts; combine thoroughly.  Immediately spoon warm topping over marshmallow; spread to cover.  Refrigerate 1 hour or until firm.  Cut into bars.

Friday, December 28, 2012

S'More Bars

Every year, the prison ministry at our church throws a Christmas party for the men where they minister.  The people in our congregation are encouraged to donate cookies for this event.  Every year I try to pick one of my favorite cookies to make for the men who attend.  This year it was these amazing S'More Bars.


I found this recipe in the 10/9/01 issue of Family Circle and first tried it our on our group of friends who attend our annual beach trip.  Although S'mores are easier to put together than these bars, they give you that flavor and they can be taken anywhere because no hot coals are required!  This recipe gets 8's and 9's on the Melnarik rating scale, plus high marks from anyone else who has tried them.


I begin by crushing the graham crackers.  I know this can be done in a plastic bag with a rolling pin, but I find the fastest way is by using my mini food processor.  This also ensures that I don't find any bits that I haven't crushed thoroughly.


In a medium bowl, I combine the graham crackers, with the salt and sugar.


To that I add the melted butter, mixing until the dry ingredients are evenly moistened.


I then press this mixture evenly into a 9-x13-inch baking dish, making sure it's even into the corners.  I then place this dish in the refrigerator while working on the brownie layer.


The first step in making the brownie layer is to chop the bittersweet chocolate.  I do this using an extremely sharp, large knife.  I don't know what I was thinking here, but I didn't remove the chocolate from the foil packaging before cutting it, so I had to remove a bunch of small pieces of the foil before I did anything else.  Note to self:  Remove chocolate completely from wrapping before placing on cutting board to chop!


In a large, microwave-safe measuring cup I placed the butter.


To the butter, I added the chopped chocolate.


After heating it in the microwave on high for 1 minute, the butter and chocolate were melted.


Using a rubber spatula, I stirred this mixture until it is smooth.  I then set it aside.


In a medium bowl, I combined the sugar and eggs.


Using a hand-held electric mixer, I beat them until well blended and slightly foamy.


While continuing to beat the mixture, I gradually add the chocolate mixture (there was no way to take a picture of this as I was holding the measuring cup with the chocolate in one hand and the mixer in the other).  I beat this combination until smooth.


Then, using a rubber spatula, I stirred in the flour and salt.


Once that was smooth, I added the vanilla and stirred the mixture until smooth.


I added the brownie batter into the baking dish, spreading evenly to cover the graham cracker crust.  I then baked it at 350°F for 30 minutes until the center was set, which I tested by gently pressing it with my fingertip.


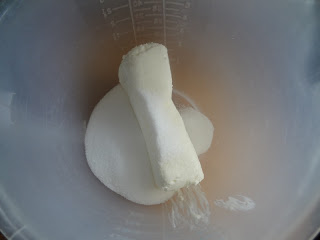
While the baking dish was in the oven, I combined the marshmallow cream with the milk using a whisk.  


The resulting mixture is smooth and runny.


I also placed 3 graham cracker boards in a zip-lock bag, and coarsely crushed them using a rolling pin.


When the brownie layer was fully baked, I removed it from the oven and immediately added the marshmallow mixture.


Using oven mitts to protect my hands, I tilted the baking dish to completely cover the brownie layer with the marshmallow mixture.


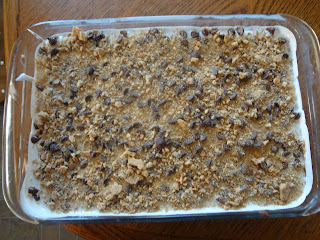
I then sprinkled the chocolate chips as evenly as possible over the marshmallow layer.


This was followed by the coarsely crushed graham crackers.  Again, distributing it as evenly as possible.  The dish went back into the oven for 3 minutes until the chocolate chips were glossy and the marshmallow cream was set.  I then placed the dish on a wire rack to cool completely before cutting into bars.


Who doesn't love a S'more or a brownie?  In this little bar, you've got both!  Enjoy!


S’more Bars

Crust:
14 whole graham cracker boards, crushed (2 ¼ cups crumbs)
3 tablespoons sugar
¼ teaspoon salt
6 tablespoons (3/4 stick) butter, melted
Brownie:
6 ounces bittersweet chocolate, chopped
¾ cup (1 ½ sticks) butter
3 eggs
1 ¼ cups sugar
1 cup all-purpose flour
1 teaspoon salt
2 teaspoons vanilla
Topping:
1 jar (7.5 ounces) marshmallow cream (about 1 ½ cups)
2 tablespoons milk
1 cup milk chocolate chips
3 whole graham cracker boards, broken up

Heat oven to 350°F. 
Crust:  Combine the graham cracker crumbs, sugar, salt and melted butter in a small bowl until the dry ingredients are evenly moistened.  Transfer the crumb mixture to a 9-x13-inch baking pan; press evenly over the bottom of the pan, pressing the crumbs evenly into the corners and along the sides of the pan.  Refrigerate the crust until chilled and set.
Brownie:  Combine the bittersweet chocolate and butter in a microwave-safe glass bowl or glass measuring cup.  Heat in a microwave oven on high until the chocolate and butter are melted, about 1 minute.  Stir mixture until smooth.  In a large bowl, with a hand-held electric mixer on medium-high speed, beat together the eggs and sugar until well blended.  Reduce the speed to medium. While continuing to beat, gradually add the melted chocolate-butter mixture; beat until the mixture is smooth, scraping down the side of the bowl occasionally.  Stir the flour and salt into the egg mixture.  Then stir in the vanilla until smooth.  Scrape the brownie mixture into the crust-lined baking pan; smoothing the top level.  Bake at 350°F for 30 minutes or until the center is set when gently pressed with fingertip.
Topping:  While the brownie layer is baking, whisk together the marshmallow cream and the milk in a small bowl until the mixture is well blended and smooth.  Pour over the brownie layer in the pan.  Spread or tilt the pan to cover the brownie layer completely.  Sprinkle the chocolate chips over the marshmallow layer.  Then scatter the crumbled graham crackers all over the top.  Bake at 350°F for 3 minutes or until the chocolate chips are glossy and the marshmallow topping is set.  Let cool in the pan on a wire rack.  Cut into bars.

Wednesday, November 14, 2012

Caramel Apple Cheesecake Bars

I know that in the fall, most people pull out their favorite pumpkin recipes for dessert and I certainly have a couple of favorites in that category, but I also love to make desserts with apples in them.  I only discovered this recipe a couple of months ago, but I've already made it a few of times and everyone who tastes it really enjoys it.  I also love caramel apples, so trying a new recipe with caramel apple in the name is not a stretch for me!


I found this recipe on Pinterest, but it originated at thegirlwhoateeverything.com.  With this being a cheesecake-type bar, I've always served it cold, but last night I was taking it to a gathering and it hadn't even cooled yet, much less had time in the refrigerator to get cold.  I couldn't believe how quickly these bars were devoured and how much everyone liked them warm!  Now I know they're great at any temperature!


In a medium bowl, I combine the flour and brown sugar.


I then add 2 sticks of butter and, using a pastry blender, work it into the flour mixture.


Unlike a lot of doughs where the butter is cut into the dry ingredients to get a crumbly mixture, this one is more soft and mixed together.  The original recipe says to get it to the point of being "crumbly, kinda."  If it looks like the photo above, you've gotten it right.


This mixture then gets pressed into a 9- x 13-inch baking dish and then gets baked in the oven at 350°F for 15 minutes.


In the meantime, in a medium bowl, I beat the cream cheese and sugar until smooth.


To that, I add the eggs, one at a time, beating with a hand mixer for about 20 seconds after adding each egg.  Then I add the vanilla and mix again until combined.  Don't mix any longer than that as it will lead to excess air being incorporated into the batter and may cause cracking while baking.


This recipe calls for Golden Delicious apples because of their soft texture.  After making this dessert several times, once using red apples, I prefer the Golden Delicious in this dessert.  The red apples added a crunch to these bars that I didn't care for.  Also, the original recipe called for cutting the apples into 3/4-inch chunks.  I cut them into about 3/4-inch by 1/4-inch chunks so there were more pieces to evenly distribute in the dish.


After placing the apple pieces in a small bowl, I tossed them with the cinnamon sugar mixture until all of the pieces were evenly coated.


By this time, the crust is out of the oven, so I pour the cream cheese mixture directly on top of the crust, making sure it is covered to the edge.  


Then I add the apple pieces, trying to get them as evenly distributed as possible.


In a medium bowl, I mix together the flour, brown sugar, and oats.


To this mixture I add a stick of butter and using a pastry blender, cut the butter into the dry ingredients until a crumbly texture.  Yes, this time it will actually be crumbly!


I sprinkle it on top of the apple layer and put it in the oven for 30 minutes.  It should be baked at 350°F for the first 25 minutes, then lower the temperature to 300°F for the final 5 minutes.


Just before serving, I drizzle the caramel sauce on top.  I usually have some extra caramel sauce on the side in case anyone feels the need for more.  I think the name fits perfectly. They certainly have the caramel apple flavor, and they have the cheesecake element, yet they are cut into bars.  To me, they're near perfection!  Enjoy!


Caramel Apple Cheesecake Bars

1 cup all-purpose flour
½ cup brown sugar
1 cup butter, room temperature
1 – 8 oz. pkg. cream cheese, softened
½ cup granulated white sugar
1 tsp vanilla extract
2 eggs
2 large Golden Delicious apples
½ tsp. ground cinnamon
2 Tbsp. granulated white sugar
½ cup oatmeal
½ cup brown sugar
½ cup butter, room temperature
1 cup all purpose flour
¾ cup caramel topping


1. Preheat the oven to 350°F (175°C).
2. In a bowl, combine the flour and brown sugar . Cut in the butter with a pastry blender (or a fork) until the mixture is crumbly, kinda.
3. With your fingertips, press the dough evenly into a 13 × 9-inch baking pan or a cookie sheet with edges. Bake 15 minutes or until lightly browned.
4. In the meantime, in a larger bowl, beat the cream cheese with 1/2 cup sugar until smooth (about 1 minute). Add the eggs, 1 at a time (beat about 20 seconds after each addition). Next add the vanilla and mix until combined.  Make sure not to over-beat the cheesecake batter as this will lead to excess air being incorporated in and may cause cracking later on.
5. Pour the cream cheese batter over the warm crust.
6. Peel the apples and chop them into small pieces.  Mix the apple chunks with the cinnamon and white sugar.
7. Spoon the apple chunks evenly over the cream cheese mixture.
8. In a smaller bowl, combine the flour, oats , and brown sugar for crumb topping. Cube the butter and using a pastry blender (or a fork), create a crumbly mixture.
10. Bake 30 minutes, or until the filling is set. Reduce the temperature to 300°F for the last 5 minutes.
11. Cut into bars and drizzle with the caramel topping.