Showing posts with label Cheese. Show all posts

Wednesday, January 2, 2013

Potato Cheese Soup


My family has been making this recipe for years, and it's certainly one of our favorite dishes.  It's fairly easy to make and travels well in a crock pot to take to a common meal with friends.


My family lovingly refers to this cheesy potato dish as "Potato Cheese Stuff."  This is because it was originally called Potato Cheese Casserole when my mom happened upon it, but it's more like a soup when piping hot, so my friends started calling it soup.  Sometimes, I thin it and serve it as soup, other times I don't add the milk and use it as a side dish.  More often than not, I take it to a pot-luck style meal where it's considered soup, so that's how I'm presenting it to you!  This recipe gets all 9's on the Melnarik rating scale.


To begin, I peel and cut the potatoes and boil them.  People boil spuds in all sorts of ways, but I've found the fastest way is to cut them into chunks that are no thicker than about 1/2 inch.  The thicker the pieces, the longer it takes to cook to the center of each piece.  


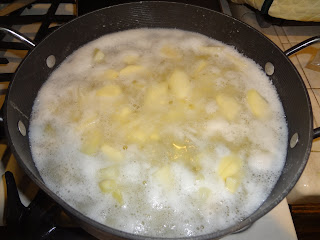
After cutting them, I place them in a Dutch oven, which I've filled about 1/3 with water.   I actually turn the heat on high as soon as I add the first potato, to save on cooking time.  As I add each potato, it brings the temperature down a bit, so the pot never begins to boil until a few minutes after I add the last spud.  The picture above was taken just after I added the last one.  Once the pot comes to a full boil, I cook the potatoes for 10 minutes.  While the potatoes are cooking, I melt the butter in the microwave and shred the extra-sharp cheddar cheese.


Once the potatoes are fully cooked (I test them by sticking a fork into them to determine if they are tender), I drain the water and place them in a large bowl.  I then add the melted butter and toss gently.  As ingredients get added, the chunks get smaller as the potatoes get broken up a bit.  We like to have some small pieces in the final product, so we mix gently as we combine the rest of the ingredients.


Next, I add the shredded cheese, and again toss lightly.  My cheese of choice for this dish is Cracker Barrel Extra-Sharp Cheddar Cheese.  I've used other brands in the past and have to add more cheese to get the great cheesy flavor that one brick of the Cracker Barrel gives this soup.  The sharpness of the cheese (the amount of aging time) gives more flavor without having to use more cheese than the recipe calls for.  My rule of thumb is the sharper, the better.


The heat of the potatoes will begin to melt the cheese while I take care of the next step, which is to combine the cream of chicken soup, sour cream, green onions, salt and pepper in a medium bowl.


The soup mixture then gets added to the potato and cheese mixture, again combining gently.  At this point, there are three choices for how to finish up the dish.  If I was taking it to a gathering, I would put it in a crock pot and cook it on low for 4 hours.  (It can also be made to this point, put in the crock of a crock pot, covered with plastic wrap and refrigerated until ready to cook.  I remove the plastic and cover it before beginning to cook.)  About 1/2 hr. before serving, I add the milk if I'm serving it as soup in bowls.  The second option, which was the cooking method suggested on the original recipe, is to transfer it to a casserole dish and bake it in the oven at 350°F for 25 minutes.  This would be the option to choose if you wanted it to be thicker and served as a side dish.  The third option, which is the fastest method and the one I chose this time, is to transfer the mixture to a Dutch oven to cook.


I did use the same Dutch oven that I had cooked the potatoes in initially; I just washed it before using it again.  You can see how thick the mixture is at this point.


I turned the heat on to a medium setting, where I began to heat the soup.  I stirred it frequently so it didn't stick to the bottom of the pot.  Once heated through, you can see that the cheese has completely melted and it's not as thick as it was before.  It can be served as a side dish at this point, because it won't run all over the plate.


To make it a better consistency to be served as soup, I add 1 cup of milk, stirring in 1/2 cup at a time to make sure it is fully incorporated.  Because I've added cold milk, I let it cook another 5 minutes or so until it is heated through.


When comparing the picture above to the one before adding the milk, you can tell it's much thinner.  Even the side of the pan is evidence of that.  The soup is still on the thick and hearty side, which is the way we like it.  If you prefer a thinner soup, add more milk in 1/2 cup increments until you get your desired consistency.


This hearty, cheesy soup is great on it's own, but we love to have it with Broccoli Supreme (already posted on this blog) and ham.  Also, you will always get compliments if you take this dish to any common meal you attend!  Enjoy!

Potato Cheese Soup

6 large Russet potatoes, boiled
¼ cup (1/2 stick) butter, melted
2 cups (8 oz.) extra-sharp cheddar cheese, shredded
1 can cream of chicken soup
2 cups (16 oz.) sour cream
½ cup green onions, chopped
1 tablespoon salt
½ teaspoon pepper
1 cup milk

Place cooked potatoes in a large bowl; add melted butter and mix lightly.  Add shredded cheese; mix lightly.  In a medium bowl, combine soup, sour cream, green onions and seasonings.  Add soup mixture to potatoes, mixing lightly to combine.

Cooking options:
·Place in casserole dish and bake at 350°F for 25 minutes (serve as side dish).
·Place in 5 qt. crock pot and cook on low for 4 hours, adding milk ½ hour before serving.
·Place in Dutch oven and cook over medium heat until cheese is melted and mixture is heated through.  Add milk ½ cup at a time to thin to soup consistency, heat through.

Sunday, November 18, 2012

Nutty Ham and Cheese Tea Sandwiches

I love hosting tea parties for the women in my life and I enjoy trying new recipes to serve at these gatherings.  The most recent one being a fall-themed tea, I thought I'd try this new recipe for a tea sandwich in the shape of an acorn.  These little sandwiches were different from most tea sandwiches in that there is no spread on the bread, plus the the nutty mix added to the top end of the sandwich.  Their uniqueness is what made them special enough to share on my blog!


I cut this recipe out of my September/October 2010 issue of Tea Time magazine and have only recently had the opportunity to make them.  These sandwiches are made using pumpernickel bread, which I've found is not readily available year round.  Because I was unable to find Pumpernickel in August, I had expected to have to order the bread ahead of time, but was surprised to find a couple of loaves in the bakery section of my market.  Also, assembling these little treats is a breeze, but the nutty topping needs to be made ahead, in fact, I started the process the day before.


To begin, the recipe calls for toasted pecans.  There are two ways to do this; one way is in the oven with the nuts spread in one layer on a cookie sheet and the other is in a frying or saucepan over medium heat.  I find with this method I have more control.  I place the nuts in a cool saucepan and turn the heat on medium.  I stir the nuts constantly, so they don't burn.  I also get close to the pan and take a good whiff every 15 seconds or so.  Before the pan heats, the pecans don't give off much aroma, but as they toast, the nutty smell gets stronger.  It's easier to use this method with almonds because you can see as the nuts toast and get browned.  With the pecans, I took them off the heat when they had a toasted and nutty aroma.  It's better to under toast them than have them burn even a little bit as they would have to be thrown away.


When I removed the nuts from the pan, I spread them on a paper towel to let them cool.  Because I wasn't using them right away, once cooled, I stored them in a zip-lock bag.


I cleaned out the remnants of the nuts in the pan and put the butter in to melt.  Because the pan was already hot, the butter began to melt immediately.


I melted the butter over medium heat until it began to brown and had a nutty aroma, which was about 7 minutes.


I removed it from the heat and poured it through a strainer to remove the foam and any solids, which I discarded.


A little foam snuck through, but I just scooped it out of the bowl with a spoon.  The result was a nice amber colored melted butter.  This butter needed to sit at room temperature until set, which would be at least an hour, so I chose to do this the day before.


The day of the tea, after slicing the bread (I didn't realize it hadn't been pre-sliced!) I used an acorn-shaped cookie cutter to get two acorns out of each slice.


Using the same cookie cutter, I cut acorns out of black forest ham and fontina cheese slices, placing the ham down first and topping it with the cheese.  As you can see, there was no spread on the bread before placing the filling on top.  The spread was on top of the sandwiches!


I'm sorry I missed getting a picture of how I made the spread.  I added the toasted pecans to the browned butter and added a little bit of honey, stirring the ingredients together to mix thoroughly.  This mixture was then spread at the top of the sandwich to resemble the acorn cap.  Aren't these little sandwiches cute?  I think so!

As I was reading through the recipe before typing it here, I realized I didn't follow it exactly!  I was wondering why I ended up with so much extra pecan/butter spread and now I know it's because I was supposed to spread the bottom slice of bread with this mixture before topping it with the ham!  I guess I was working so quickly to get everything assembled, I didn't read the recipe correctly.  I will type the recipe as it should have been made and will make it that way the next time!  I imagine it will only be that much better with the nutty spread in each bite!  Enjoy!

Nutty Ham and Cheese Tea Sandwiches

1 recipe Pecan Brown Butter (recipe follows)
12 slices pumpernickel bread, cut into 2 acorn shapes each*
12 slices black forrest ham, cut into acorn shapes*
12 slices deli-sliced fontina cheese, cut into acorn shapes*

Spread approximately 2 teaspoons Pecan Brown Butter onto 1 slice bread.  Layer 1 slice of black forrest ham and 1 slice fontina cheese.  Top with 1 slice bread.  Spread approximately 1 teaspoon Pecan Brown Butter onto top one-third of sandwich (to resemble an acorn cap).  Repeat with remaining ingredients to make 12 sandwiches.  Serve immediately.

* I used a 2 1/2- x 3 1/2-inch acorn-shaped cookie cutter

Pecan Brown Butter

1/2 cup butter
1/2 cup finely chopped pecans, toasted
1 teaspoons honey

In a small saucepan, melt butter over medium heat.  Continue to cook until butter begins to brown and has a nutty aroma, 6 to 8 minutes.  Remove from heat, and strain, discarding solids.  Let sit at room temperature until set, approximately 1 hour.  Add pecans and honey, stirring to combine.  Use immediately or store in the refrigerator for up to 5 days.

Thursday, May 10, 2012

Welsh Rarebit

I attended a Royal Ladies' Tea Society tea the other day where we were honoring our mothers.  Each attendee was asked to bring a dish to complete the meal.  My mom was born in Ireland and some of my favorite dishes of hers she learned to make at her mother's side.  This is one of those recipes, which she made often as I was growing up.  I have made it for my boys and they love it, too.  They've even request it for lunch every once-in-a-while.  It seemed the perfect choice to honor my mom at the tea.


This was usually served at lunch time on top of buttered toast, but sometimes we'd eat it on Ritz crackers, which is how I chose to serve it at the tea.  There are only two ingredients and it's fairly simple to make, but it tastes great.  


I begin by cracking my eggs into my saucepan (I use a pan big enough to allow room for stirring).  I always use extra-large eggs.  Hint:  One way to check to see how fresh your eggs are is to drop them (in the shell) one-by-one into a glass of water.  If they sink, they are very fresh, if they float, don't even crack them as they are bad; throw them out immediately as you don't want that smell in your house!  If the eggs bounce a little before settling on the bottom of the glass, they are still good; only the floaters are bad.  I'm not an Alton Brown or scientist, but I understand that as eggs go bad, the little pocket of air under the shell becomes a gas (which is lighter than air), thus causing the bad eggs to float!  This test works so well, I don't pay any attention to the expiration date on the box the eggs come in!


You'll notice that I don't  use any type of oil or butter in the pan, as the cheese provides enough oil so the mixture doesn't stick to the pan.  Using either a whisk or a fork, I beat the eggs until the yolks and whites are combined.


After I grate the cheese, I add it directly on top of the eggs.  I always use extra-sharp cheddar cheese when making this dish.  The sharper the better as that's what gives Welsh Rarebit it's great flavor.  One of my favorite brands is Cracker Barrel.


Once I mix the cheese into the eggs, I still see mostly cheese, but it is all covered with egg.  Up until this point, I can leave the stove if called away.  Once I turn the heat on under the pan, I'm committed to standing there and stirring until it's done!


At first, it seems as though nothing changes as I stir and stir.  But the cheese does melt completely into the eggs; I just have to be a little patient.  You'll notice the deeper color and that it has a thin layer of froth at the sides.  If you don't stir constantly, the eggs can begin to cook before the cheese melts and then you'll just have scrambled eggs with cheese.  It's also important to cook it over medium-low heat, otherwise you risk getting cheesy scrambled eggs.


I'm sure a chemistry major could probably tell you why, but I think it's interesting that, as long as I keep stirring the mixture, it doesn't begin to cook until all of the cheese is melted.  I know it's cooking when I start to see some of it on the edge of my spoon (or Pampered Chef spoontula).  As it cooks, I keep scraping the pan in different areas as if I was making scrambled eggs.


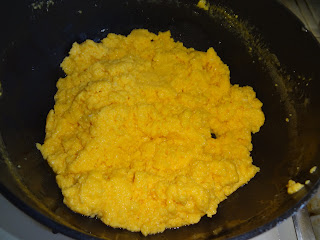
When it's finished it has a finer texture than scrambled eggs.  It's ready to serve either on buttered toast (being of British descent, we used a knife and fork to cut a piece before eating it) or crackers (of course, everything tastes better if it sits on a Ritz! - sorry, I couldn't resist that).  When I took it to the tea, I put it in a small crock pot to keep it hot.  I used the smallest Pampered Chef scoop to put it on the crackers for the ladies.  It is best hot, so I wish I had let them serve it themselves so it wouldn't cool down on the platter.  It's a simple dish, but oh so good.  Enjoy!

Welsh Rarebit

6 extra large eggs
12 oz. extra-sharp cheddar cheese, grated

In a medium saucepan, combine eggs and cheese.  Over medium-low heat, cook this mixture, stirring constantly, until the cheese is melted.  Continue stirring and scraping the pan, as if making scrambled eggs, until fully cooked and the mixture has a fine texture.  Serve on buttered toast or crackers.  Best when served hot.