Showing posts with label Breakfast. Show all posts

Wednesday, August 14, 2013

Bacon and Hash Brown Egg Bake


We were having over-night guests, so I wanted to make a breakfast casserole that I could prepare the day ahead and bake in the morning.  Of course, this was the perfect opportunity to try a new recipe.  This one sounded a bit different because of the Dijon mustard and vegetables, so I thought I'd give it a try.


I found this recipe on Pinterest, but originated at BettyCrocker.com.  How could I go wrong with a Betty Crocker recipe?  The preparation was easy and it was a hit with everyone who partook.  This dish got 7's and mostly 8's on the Melnarik rating scale.


To begin, I cut the bacon into 1-inch wide strips and cooked them over high heat in a medium skillet until crisp.


I removed the bacon from the pan with a slotted spoon and placed it on several layers of paper towels to drain and cool.


After removing all but 1 tablespoon of the bacon drippings, I added the onion, red bell pepper and sliced mushrooms to the skillet.  I cooked the vegetables over medium heat, stirring occasionally, for about 5 minutes, until the vegetables were tender.


I then stirred in the salt, pepper and Dijon mustard.


In a large bowl, I combined the eggs and milk, using a whisk.


The mixture should be fully blended, but not whipped until it is foamy.


After greasing a 9- x 13-inch baking dish, I evenly placed half of the thawed hash brown potatoes on the bottom.


Then, I evenly distributed the vegetables.


On top of that, I added half of the cheese.


The rest of the hash browns were added as the next layer.


I poured the egg mixture evenly on top and covered the baking dish in plastic wrap.  I placed it in the refrigerator to chill overnight.


I placed the remaining cheese and the cooled bacon in bowls, covered them with plastic wrap and placed them in the refrigerator also.


About 1 1/2 hours before serving breakfast, I preheated the oven to 325°F.  I removed the baking dish from the refrigerator, took off the plastic wrap and placed it in the preheated oven to cook for about an hour.  When it came out of the oven, the egg was nicely cooked and the cheese was melted.


Taking the leftover cheese from the day before, I sprinkled it evenly over the dish.


I then added the bacon I had reserved, sprinkling it as evenly as possible over the cheese.


Back into the oven it went for an additional 5 minutes to melt the cheese and heat the bacon through.


The dish was easy to cut into squares for serving and pared with some wheat toast, it was a hearty breakfast.  It was a nice way to serve some vegetables at breakfast, and who doesn't love bacon!  Enjoy!


Bacon & Hash Brown Egg Bake (Betty Crocker)

1 pound bacon, cut into 1-inch pieces
1 medium onion, chopped (1/2 cup)
1 medium red bell pepper, chopped (3/4 cup)
1 package (8 oz.) sliced fresh mushrooms
2 tablespoons Dijon mustard
½ teaspoon salt
½ teaspoon pepper
¾ cup milk
12 eggs
1 package (2 lb.) frozen hash browns, thawed
2 cups shredded Cheddar cheese (16 oz.)

In a 12-inch skillet, cook bacon until crisp.  Using slotted spoon, remove from pan to small bowl; cover and refrigerate.  Drain drippings, reserving 1 tablespoon in pan.  Add onion, bell pepper and mushrooms; cook 4 minutes over medium heat, stirring occasionally.  Stir in mustard, salt and pepper.  In large bowl, beat milk and eggs with wire whisk.  Spray 9-x13-inch baking dish (3 qt.) with cooking spray.  Spread half of hash browns in baking dish.  Add onion mixture evenly on top.  Sprinkle with half of the cheese; refrigerate remaining cheese.  Spread remaining hash browns over top.  Pour egg mixture over entire casserole.  Cover; refrigerate 8 hours or overnight. 

Preheat oven to 325°F.  Uncover baking dish; bake 50 to 60 minutes or until thermometer inserted in center reads 160°F.  Sprinkle with remaining cheese and the bacon.  Bake 3 to 5 minutes longer or until knife inserted in center comes out clean, top is puffed and cheese is melted.  Let stand 5 minutes before serving.


Wednesday, August 8, 2012

Apple Raisin Muffins and Cinnamon Butter

When we were invited with a group of friends to spend the weekend at the home of friends who had moved away, we each took a meal that we were in charge of.  I got breakfast on the Sunday morning.  I  thought a lot about what I could make that was great, but didn't take much time to prepare or clean up from because we were all going to church afterward.  I finally decided on these mini muffins because all the work was done at home!  They were a huge hit that weekend and as the same group of friends attends our annual beach trip weekend, I now make these muffins each year to take along.


I originally saw Paula Deen make these muffins on one of her shows, so I went on line to get the recipe.  On the show, she ate them plain and they're terrific that way, but I "Paula Deen" them by serving them with homemade cinnamon butter (recipe included below)!  The cinnamon butter can be used straight from the refrigerator if it is being applied to something hot like toast, but for use on these muffins, I bring it to room temperature before using it.  The only down side to this recipe is that you have to have plenty of time to prepare them.  The prep time in itself isn't long, but there are 2 steps in the process with a lot of cooling time needed in between!  Don't get me wrong -- the time investment is totally worth it!


The first step is to grate the apples.  I give them a good wash and then grate them with the peel on.  I have found it easiest to grate around the apple first to get through the peel, then grate it vertically the rest of the way.


As you can see from the photo above, I grate it right down to the core.  Usually, 2 medium apples yield the 2 cups needed for this recipe.


The easiest way to grate nutmeg, I've found is to use my microplane.  Holding the handle, I rest the tip on my surface and run the nutmeg along the side until I get the amount I need.  It's a very handy kitchen tool that can also be used to zest lemons, limes and oranges or grate ginger or parmesan cheese!


In a large saucepan, I place the butter, sugar, raisins, apples, cinnamon, nutmeg and cloves.  Don't worry if the apples have begun to darken, they are perfectly fine and they won't even be distinguishable by the time this mixture is cooked!  I turn the heat on high and once the butter begins to melt, I can stir the ingredients to combine them.  


Once this mixture begins to boil, I turn off the heat and remove the pan to let it cool.  This is when the waiting begins.  Depending on the time of year and how warm it is in your kitchen, this could take hours!  I usually do this part in the morning, so I can bake the muffins in the afternoon.  The mixture does need to cool completely before the next step.


I use muffin tin liners in my mini muffin pan, but if I'm out, the tin can also be greased.  One friend is allergic to nuts, so I use different liners for 6 of them to distinguish the nut-free muffins just for him!


In a large bowl, I combine the flour and baking soda.  Then I add the cooled apple and raisin mixture.


This makes a fairly stiff dough.


Using my Pampered Chef medium scoop, I fill the 6 liners with the nut-free dough.


Then I add in the pecans and mix to combine.  I fill the rest of the muffin tin and it's ready to go into the oven.  Of course, the nuts can be added before the apple/raisin mixture if you don't have any nut allergies to worry about.


These muffins don't rise much, so they should be filled to the top.  Using the scoop, it looks as though the dough comes above the top of the tin, but this amount is perfect.


You can see in the photo above, that they rise a bit and are a perfect golden brown when they come out of the oven.  I let them cool a couple of minutes before removing them from the pan to a wire rack to cool completely.  I store them in Tupperware with wax paper separating the layers when taking them to the beach.  This recipe makes 5 dozen, so if you don't plan to use them all at once, they freeze very well.


We love to eat these tasty little treats at breakfast time and they are especially good warm (they can be heated in the microwave), and they're great as a snack, but we're used to having them on our beach trip weekend as we visit with very good, long-time friends!  Enjoy!


Apple Raisin Muffins

1 cup water
2 cups sugar
2 cups grated apples
2 cups raisins
1 cup (2 sticks) butter
2 teaspoons ground cinnamon
2 teaspoons freshly grated nutmeg
½ teaspoon ground cloves
1 cup chopped pecans
2 teaspoons baking soda
3 ½ cups all-purpose flour

Combine the water, sugar, apples, raisins, butter, cinnamon, nutmeg, and cloves in a large saucepan; bring to a boil.  Remove the pan from the heat and cool completely.

Preheat the oven to 350°F.  In a large bowl, stir the baking soda and nuts into the flour.  Add the cooled mixture to the bowl and stir until blended.  Grease miniature muffin tins or line with paper liners.  Fill muffin tins with batter to the top.  Bake for 15 minutes at 350°F.  These muffins are great served warm or at room temperature and they freeze well.

Cinnamon Butter

1/2 cup (1 stick) butter at room temperature
1 cup powdered sugar
1 1/2 heaping teaspoons ground cinnamon

In a medium bowl, cream together butter and sugar.  Add cinnamon; combine thoroughly.  Store in refrigerator.

Wednesday, July 4, 2012

Liza's Breakfast Hash

This is a pretty easy breakfast that is hearty and quite flavorful.  When I first came up with this I spent time cubing potatoes and cutting onions and bell peppers.  I know fresh is always better, but frozen is the next best thing, so to save time, I use the frozen Potatoes O'Brien.  I use more onions and bell pepper when I do it myself, but I like the time saving aspect of using the frozen mix.  Therefore, I will show you the easier way to do it here.


Also, when I first started making this dish, I would use kielbasa or some other sort of sausage, browning it in a separate pan before adding it to the potato mixture.  One time my husband suggested I try chorizo in it and have been making it that way ever since.  The chorizo adds a bit of heat to the dish, so if you prefer dishes that aren't spicy at all, you may want to use a sausage in this dish.


This takes 3 pans to prepare and I start them all at one time!  In my large wok, I begin cooking the potatoes O'Brien using butter for flavor instead of the oil listed in the directions on the bag.  In another pot I start cooking the chorizo to render out the fat.  The last pot gets some butter in which to cook the scrambled eggs.


I use a medium bowl to beat the eggs before adding them to the pan where I've melted a bit of butter.  While cooking the eggs, every so often I stir the chorizo so it won't stick to the pan and turn the potatoes so they get evenly cooked and browned.


I place four layers of paper towels in the bowl I used to beat the eggs and place the chorizo in them to absorb a lot of the grease.  Beside wanting to get rid of the extra fat, it will keep the chorizo from completely coloring the whole meal the color of the chorizo.  The dish doesn't look as appealing that way, believe me I know from experience!


The potatoes should not be stirred often as that will make them mushy and not allow them to get nicely browned.  I like to cook them until it looks as though each cube has at least one side browned.  As long as the potatoes are cooked, it's a matter of preference as to how brown you want them.


Once the potatoes are ready, I add the scrambled eggs and toss to combine, breaking up any large pieces of egg.


As you can see from the picture above, there is quite a bit of grease that came out of the chorizo.


I add the chorizo to the pan and toss to incorporate it evenly.


I sprinkle the cheese on top and cover the pan to help it melt more quickly.  Then I serve it directly from the pan at the table.


This is a tasty as well as a hearty breakfast that will start any day off right.  Enjoy!


Liza's Breakfast Hash

1 (28 oz.) bag frozen Potatoes O'Brien
1 pound chorizo
8 eggs
1 stick (1/2 cup) butter, divided
2 cups shredded cheddar cheese

In a Dutch oven or wok, melt 5 tablespoons of butter and begin cooking potatoes over medium-high heat, turning every so often to cook and brown evenly.  In the meantime, remove chorizo from casing and cook in a small saucepan over medium heat, breaking up the meat at it cooks.  In another saucepan, melt remaining 3 tablespoons of butter.  In a medium bowl, beat eggs; add to melted butter and cook over medium heat, scraping the pan as the eggs cook.  Place paper towels in the bowl in which the eggs were beaten; add cooked chorizo to drain fat.  When potatoes are fully cooked and browned to your liking, add scrambled eggs, tossing to combine and breaking up any large pieces of egg.  Add chorizo and toss to combine.  Top with shredded cheese, cover and let stand for a few minutes to let the cheese melt.

Thursday, June 28, 2012

Mini Cinnamon Rolls

Cinnamon rolls are one of my favorite things to eat.  I don't eat them often, which makes it a real treat when I get to have one.  I'm not a morning person, so making them from scratch is normally out of the question because of the time needed to let the dough rise.  When I find a recipe that sounds good and cuts out that rising time, I like to give it a try.  This one uses refrigerated crescent roll dough and bakes in only 13 minutes!   


In addition to the ease of putting these treats together and the short time invested in doing so, another great thing about this recipe is that the rolls are baked in a mini muffin tin, so you get 16 mini cinnamon rolls from each batch.  The first time I made them, I took them to a Bible study I was attending and everyone loved them and asked for the recipe.  I originally found this recipe on Pinterest by Iowa Girl Eats.  She didn't give exact measurements on a couple of the ingredients, but I've added them to my recipe below for your convenience.


I begin by putting a little flour on my work surface so the dough doesn't stick.  When I open the can and take out the dough, I "peel" off the first rectangle of dough and place it on my surface.  Then I pinch together the perforated seams, flip the dough over (making sure there is more flour underneath) and pinch the seams on the other side.


I then lightly roll the dough with a rolling pin to smooth out the seams and to make the dough a uniform thickness.


In a small bowl, I combine the brown and white sugars with the cinnamon.


Next, I spread half of the butter on the dough.  This helps to make the cinnamon/sugar mixture adhere a bit to the dough and contributes to the ooey, gooey goodness once baked.  Sorry, I forgot to take a picture of this step before I started adding the cinnamon/sugar mixture.


Using a tablespoon, I sprinkle half of the cinnamon/sugar mixture over the dough, then using the back of the spoon, spread it over the dough, almost to the edges.


The next step is to start rolling the dough into a log, beginning on the long side.  Because of the dry cinnamon/sugar mixture, this won't be a tight roll.


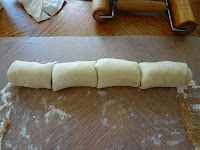
I didn't measure it, but I would guess it is about a foot long when rolled up (left).  Make a cut right in the middle to make 2 pieces (right).


 Cut each of those pieces in half (left), and then each of those pieces in half (right).  I then have 8 pieces.

I spray my mini muffin pan before carefully placing the cinnamon rolls in the pan, cut-side up.  Then I repeat with the other piece of dough from the can.  Most mini muffin pans hold either 12 or 24 muffins, so either one large pan or two of the smaller pans should be used.  Hint:  Whenever you use muffin tins where not every space gets used, put some water about half way up in the empty spaces to aid in even baking.


Don't they look scrumptious?  They are a beautiful golden brown and smell heavenly!


About 5 minutes before the rolls come out of the oven, I begin making the icing.  I work the softened butter into the powdered sugar before adding the maple syrup and milk.


Once all of the ingredients are incorporated and smooth, it should be thick enough to spread where the heat of the roll will allow it to melt into the cinnamon crevices!  Hint:  Let the rolls sit for a minute once they come out of the oven so they aren't so hot that the icing all melts to the bottom of the pan.


I usually frost them in the pan before removing them to a serving platter.


I use a spoon to remove each roll from the pan to serve.  This way I don't loose any of the gooey cinnamon goodness that has made it's way to the bottom of the pan.  The only problem with these tiny cinnamon rolls is their size.  It's easy to keep popping them in my mouth before realizing I've eaten more than I would have if I had eaten one normal size cinnamon roll!  It really is hard to stop eating these scrumptious little cinnamon rolls!  Enjoy!


Mini Cinnamon Rolls
  
1 (8 oz.) tube crescent roll dough
3 tablespoons softened butter
1/3 cup firmly packed brown sugar
2 tablespoons white sugar
1 teaspoon cinnamon
¾ cup powdered sugar
2 tablespoons softened butter
1 teaspoon maple syrup
1 teaspoon milk

Preheat oven to 375°.  Lay out half the dough (4 triangles) on lightly floured work surface and pinch all seams together.  Flip the dough and pinch seams together.  Using a rolling pin, smooth the seams and roll the dough until about ¼ thick, keeping the rectangular shape.  Spread half of the butter on the dough coming almost to the edges.  In a small bowl, combine the sugars and cinnamon.  Sprinkle sugar mixture over butter, covering completely.  Starting at the long side, carefully roll dough into a log.  With a sharp knife, make one cut in the middle of the log, cutting it in half.  Cut each of these pieces in half, then each of the resulting pieces in half again.  You should have 8 pieces.  Place each piece in a mini muffin pan sprayed with a non-stick coating.  Repeat with the other half of dough.  Bake at 375° for 13 minutes, or until golden brown.  Meanwhile, in a small bowl, mix together powdered sugar and butter; and syrup and milk.  Remove buns from oven, let sit for 1 minute before icing.  Enjoy!