Tuesday, July 31, 2012

Peach and Mustard Glazed Pork Tenderloin

This dish is so easy to make and yet so flavorful, it has become one of my favorite things to grill!  I found this recipe years ago in a recipe book that was sold near the check out stand at the market.  This particular recipe sounded so good I tried it immediately and it was a hit with my family.


The meat is so tender and the marinade adds that special flavor.  This dish gets 9's all around on the Melnarik rating scale.  I love to serve this with the Grilled Asparagus and New Potatoes which I've posted below.  The two dishes go very well together.


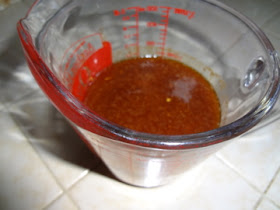
I begin by placing the peach preserves, Dijon mustard, olive oil, thyme leaves and salt in a measuring cup.  I use a measuring cup instead of a bowl for ease of pouring the marinade over the meat later.


Using a whisk, I mix the ingredients together until well combined.


I place the pork tenderloins in a large resealable plastic bag.


I pour the marinade directly on top and seal the bag.


Then I manipulate the bag, turning the pork to make sure the tenderloins get completely covered in the marinade.  I put the bag in the refrigerator for at least 1 hour to fully marinate.


After getting the grill ready, I remove the pork from the bag, reserving the marinade and placing it in a small bowl for basting the pork.  I place the pork over direct medium heat and cook covered, turning every 10 minutes or so, basting with the reserved marinade each time I turn it.  I cook the asparagus and potatoes at the same time, making that dish the perfect accompaniment for this pork dish.  See the following post for that recipe.


When the pork is fully cooked, I remove it to a cutting board and let it rest for 5 minutes before slicing.


Even after resting, you can see that this meat is juicy and tender and oh so good!  If there is any remaining marinade, I heat it to boiling in a small saucepan, letting it cook for 1 minute, and serve it with the meat.  Enjoy!


Peach and Mustard Glazed Pork Tenderloin

1/2 cup peach preserves
2 tablespoons Dijon mustard
2 teaspoons olive oil
1/4 teaspoon dried thyme leaves
1/4 teaspoon salt
2 pork tenderloins (about 3/4 pound each)

In a 2-cup measuring cup, combine the peach preserves, Dijon mustard, olive oil, thyme and salt to make the marinade.   Whisk until fully combined.  Place pork in a large resealable plastic bag; pour marinade over pork, seal bag and turn meat in marinade until fully coated.  Place in refrigerator for at least 1 hour but no longer than 8 hours.  Heat coals or gas grill for direct heat.  Remove pork from marinade; reserve marinade.  Cover and grill pork over medium heat 25 to 30 minutes, brushing occasionally with marinade and turning at least twice during cooking time, until pork has slight blush of pink in center and meat thermometer inserted in center reads 160 degrees.  Let pork rest 5 minutes before slicing.  Heat remaining marinade to boiling in a small saucepan; boil and stir 1 minute.  Cut into slices; serve with marinade.

Grilled Asparagus and New Potatoes

I found this recipe years ago in a Great Grilling recipe book I found near the check out stand at the market.  It is the perfect accompaniment for the Peach and Mustard Glazed Pork Tenderloin, which I will share with you also.


The first time I made this, I wasn't sure my boys would like it as they were much younger, but the smoky flavor with the mild seasoning made it a hit with all of my guys.  They give this dish 8's on the Melnarik rating scale!  What I love about it is that it's so easy to put together.


In a medium bowl, I combine half of the required amounts of salt and lemon-pepper seasoning in extra virgin olive oil.


I then scrub the new potatoes and cut them into approximately 1/2-inch cubes.  They get added to the olive oil mixture and tossed until all of the pieces of potato are coated.


The potatoes then get put directly into a grill basket which is directly over the coals, or heat source if using a gas grill.  I forgot to take a picture of just the grill basket, so you're seeing how I cook the side dish at the same time as the main course of pork tenderloin.  If you don't have a grill basket, heavy duty foil with some holes punched in it will also suffice.  I cover the grill and take the lid off every few minutes to stir the potatoes so they cook evenly.  The potatoes take longer to cook, so they begin cooking in the basket alone for about 10 minutes before adding the asparagus.


In the meantime, I combine the remaining salt, lemon-pepper seasoning and oil in the same bowl I used before.  I cut the asparagus into 1-inch pieces, discarding the tough ends, and toss them in the bowl with the seasoned oil.  Then I add the asparagus to the grill basket, cooking the vegetables covered and stirring every few minutes for even cooking.


After about 10 minutes, the vegetables are fully cooked and I removed them from the basked to a serving bowl.  Just looking at that picture makes my mouth water!  Enjoy!


Grilled Asparagus and New Potatoes

2 tablespoons extra virgin olive oil
1/2 teaspoon salt
1/2 teaspoon lemon-pepper seasoning
1 lb. red potatoes
1 lb. fresh asparagus spears

Heat grill.  In a medium shallow bowl, combine 1 tablespoon of the oil with 1/4 teaspoon of the salt and 1/4 teaspoon of the lemon-pepper seasoning.  Scrub potatoes clean.  Do not peel.  Cut into 1/2-inch cubes.  Add potatoes to oil and seasonings; toss to coat.  Place grill basket on gas grill over medium heat or on charcoal grill 4 to 6 inches from medium coals.  Cook 10 minutes, turning potatoes occasionally for even cooking.  Meanwhile, in same bowl, combine remaining oil, salt and lemon-pepper seasoning.  Trim asparagus and cut into 1-inch pieces.  Add to bowl and toss to coat.  Add asparagus to potatoes in grill basket.  Cook about 10 minutes or until potatoes and asparagus are tender, turning and mixing vegetables occasionally.


Sweet and Spicy Chicken Wraps

It's still summer and quite hot outside, so I pulled out another recipe we love from my recipe file labeled sandwiches.  I consider a wrap a sandwich because the filling is enclosed in a tortilla (which is sort of like bread) and it is held while eating it.  For those of you who don't like spicy foods, this is not super spicy.  The heat doesn't come from the salsa, but from the cayenne pepper, so you can adjust the amount you use to suit your taste.


This sweet and spicy wrap gets 8's and 9's on the Melnarik rating scale.  It comes under the healthy food category as it has fresh spinach leaves and cucumber and the chicken is a lean meat.  I found this recipe in a Pillsbury recipe book at the check out stand in the market in 2010.  The recipe indicated that Shreya Sasaki of San Diego, was the author.


The sweet component in this wrap comes from the spread.  In a small bowl, I mixed together mayonnaise, honey and finely diced cucumber.


I covered the bowl with plastic wrap and placed it in the refrigerator until I was ready to build the wraps.  It's always a good idea to keep any food items containing mayonnaise in the refrigerator for as long as possible and discard any leftovers that have been at room temperature for a long time.


To prepare the chicken, which is the spicy component, the recipe called for 1.25 pounds of boneless, skinless chicken breasts to be cut into 1/4-inch strips and cooked in a frying pan in olive oil.  The evening I made this, I didn't have much time to put dinner together, so I used the already cooked chicken strips that can be found in most markets, plus Costco.  I still put the chicken in a skillet to heat  and to make sure the seasoning and salsa got cooked into the meat.


Once the chicken was heated through, I added the salsa and cayenne pepper, stirring until everything was completely combined.  I then turned off the heat and let this mixture cool a little while moving on to the next step.


I heated my flour tortillas in the microwave so they wouldn't break when folding the wraps.  I took the spread from the refrigerator and spread about 2 tablespoons of this mixture down the middle of the tortilla.


Using the baby spinach that comes washed and ready to use straight from the bag, I placed a small handful on top of the spread.


On top of the spinach, I placed some of the chicken.


Instead of rolling it, I chose to fold it into an open burrito.  I begin by folding up the bottom.


Then I fold in the left side.


Finally, I fold in the right side and secure it with a toothpick.  I have found that this recipe makes more of the spread than we need for one meal, so I usually make up another batch of the chicken later in the week and we have it again.  I also like to keep some of the spread, chicken and spinach leaves in the refrigerator for a quick wrap that can be put together in no time.  Enjoy!


Sweet and Spicy Chicken Wraps


1/2 cup mayonnaise
1/4 cup finely chopped seeded cucumber
2 tablespoons honey
1 tablespoon olive oil
1.25 lbs. boneless, skinless chicken breasts, cut into 1/4-inch thick strips
2/3 cup mild salsa
1/2 teaspoon ground red pepper (cayenne)
8 soft taco size flour tortillas
4 cups loosely packed fresh baby spinach leaves (about 4 oz.)

In a small bowl, mix mayonnaise, cucumber and honey.  Cover; refrigerate until needed.  In a medium skillet, heat oil over medium-high heat until hot.  Add chicken; cook, stirring frequently, 6 to 8 minutes or until chicken is no longer pink in center.  Stir in salsa and cayenne pepper.  Reduce heat to medium-low; simmer, stirring occasionally, 5 minutes or until flavors are blended.  Microwave 4 tortillas at a time on High for 20 to 30 seconds or until warm and pliable.  Spread each tortilla with 1 to 2 tablespoons of the mayonnaise mixture; layer with 1/2 cup loosely packed spinach leaves and 1/3 cup of the chicken mixture.  Fold or roll; serve.

Thursday, July 12, 2012

Baja Chicken Salad

Another thing I like to make when the weather is extremely hot is a salad that can be served as the main course, or as I like to call it:  a meal salad.  This one is fairly simple to put together, doesn't heat up the kitchen in the process and tastes great!


I found this recipe in the Pillsbury 40th BAKE-OFF Contest Cookbook and it gets 8's and 9's on the Melnarik rating scale!


Some of the dressing is used while cooking the chicken, so it gets made first.  I use a 2-cup measuring cup in which to combine the oil, vinegar, brown sugar and taco seasoning using a small whisk.  I make sure I whisk it just before adding some to the chicken and again before tossing more with the salad.


The recipe calls for 4 boneless, skinless chicken breast halves cut into 1-inch pieces.  The chicken is placed in a medium saucepan and 1/2 cup of the dressing is poured over it, tossing to make sure all of the pieces are coated.  The rest of the dressing is reserved to toss with the salad greens.  The chicken then gets cooked over medium-high heat until no longer pink in the center.  This is the way I usually cook the chicken, but tonight I didn't happen to have any fresh or defrosted chicken breasts when I started preparing dinner, so I thought I'd try some already cooked chicken breast strips I try to always have on hand.  I used the same method, combining the dressing with the chicken and heating it in a saucepan.  The only difference was that the chicken was already cooked, so I was only heating it through.  It worked wonderfully, so now I know I can prepare this salad either way!


While the chicken is in the saucepan, I quarter the grape tomatoes and dice some red onion.


The tomatoes and onion get tossed in a large bowl with the romaine lettuce.


Then the dressing gets tossed in.  I add a little at a time, tasting as I go, because my family prefers less to more.  I never seem to use all of the dressing.


 This mixture then gets put on a large platter.


 The chicken is placed right on top of the lettuce mixture.


The cheese is sprinkled on top of the chicken.


The last thing to place on top is the avocado, adding as much as your family likes!  Can you tell most of us like avocados?  This is an extremely satisfying salad.  Enjoy!

Baja Chicken Salad

1/2 cup vegetable oil
1/2 cup cider vinegar
1 tablespoon brown sugar
1 pkg. taco seasoning
4 boneless, skinless chicken breast halves, cut into 1-inch pieces
1 (10 oz.) bag romaine lettuce
1 cup grape tomatoes, quartered
1/2 cup diced red onion
1 1/2 cups Cheddar/Monterey Jack cheese blend
1 - 2 avocados, pitted, peeled and sliced

In a 2-cup measuring cup, combine oil, vinegar, sugar and taco seasoning; mix well.  Place chicken in a medium saucepan.  Pour 1/2 cup of seasoning mixture over chicken; toss to coat.  Reserve remaining mixture for dressing.  Cook chicken over medium-high heat until no longer pink in center; cool.  In a large bowl, combine lettuce, tomatoes and onion.  Add reserved seasoning mixture; toss to coat.  Arrange salad mixture on serving platter.  Top with chicken, cheese and avocado.  

Grilled Cheese Italiano

My husband told me last night that this is his favorite sandwich that I make.  It's also the easiest!  This is a totally new spin on the old classic grilled cheese sandwich.  


In the original, American cheese is the staple, but in this sandwich I use Swiss cheese.  With a couple other ingredients, it has the Italian flavor, thus the name.  I found this recipe in one of those little Pillsbury cookbooks that are sold at the checkstand in the grocery store.  This sandwich gets 8's and 9's on the Melnarik rating scale.  If it is truly my husband's favorite, I think he should give it a 10, I'm just sayin'!


One of the nice things about this sandwich is that it's so easy to put together and doesn't take long to cook.  I had to feed my guys at two different times, so this was the perfect choice; I didn't feel as though I was preparing two whole meals.  I put my bread directly on my grill pan and apply a little butter to one side of each sandwich.  Then I flip them over and "open" the sandwich.


The first layer is the Swiss cheese.  This nice whole grain bread is wider than the normal "sandwich" bread, so I had to use 1 1/3 slices.


Next on is some deli smoked ham.


Then I add some fresh basil leaves.  To me, this is what makes this sandwich.  One of my sons and I love this punch of flavor, so I add the full leaves to our sandwiches.  For my husband and other son, I take one basil leaf and tear it into small pieces and distribute it evenly over the ham.  I top that with very thinly sliced Roma tomatoes and more Swiss cheese followed by a quick sprinkle of pepper. (Sorry, no photo.)  I replace the top piece of bread and apply butter to it.


It gets grilled like a normal grilled cheese sandwich over medium heat, flipping it when the first side is toasty and removing it from the griddle when the second side is toasty.  My mom used to make grilled cheese and ham sandwiches that I loved, but this takes it a step further and is even more tasty.  Enjoy!

Grilled Cheese Italiano

Whole-grain bread, 2 slices per sandwich
Softened butter
Sliced Swiss cheese
Thinly sliced deli ham
Fresh basil leaves
Roma tomato, thinly sliced
Pepper

Place 2 slices bread on griddle, butter one side; flip so buttered side is against griddle.  Open and layer with Swiss cheese, ham, basil, tomato slices, and Swiss cheese; sprinkle with pepper.  Place top slice of bread on top and apply butter.  Cook over medium heat until toasty, flip and cook until toasty.

The Perfect Picnic Sandwich

I don't know if I've shared this before, but I try out a new recipe at least once per week!  That's why I started the rating scale in my house, to determine how much my guys like a new recipe.  The scale is from 1 to 10 with 10 being the best, but my guys say there is always room for improvement, so the best I ever get is a 9.  So, in our house, 9 is the new 10!  Now that I've started a blog, not only do I pay attention to how my guys rate a new dish to determine whether or not I'll ever make it again, but I also have to decide if a recipe is "blog worthy!"  I only want to share with you all what I consider to be the best recipes I use.  This sandwich got 8's and 9's on the Melnarik rating scale.


With the weather forecast of over 100 degree heat several days this week, I decided to make a couple of sandwiches and chose this new recipe for one evening.  I found this recipe on Pinterest where the original recipe came from applevalleygirl.blogspot.com.  This sandwich appealed to me because of the vegetable mixture that went into it.  It never hurts to try different ways to get veggies into my guys!  This is intended to be a sandwich that is built earlier in the day and eaten at a later time, say at a picnic.   I made it and served it right away.


The original recipe called for 1 cup of either red, yellow, or orange bell pepper.  I thought the blended colors would be nice, so I used 1/3 cup of each.  From the picture above, you can see that it only took one side of each bell pepper diced to equal 1 cup.


It's hard to see in the photo above, but there are seeded and diced tomatoes on the bottom with the peppers, red onion, garlic and fresh basil on top.


All of those ingredients got mixed together.  It was so aromatic it was making my mouth water!  It's happening again as I think about it!  If I was to make this for a picnic, I would put this mixture on paper towels to draw out some of the moisture before putting it in the bread to help avoid the bread getting soggy.


I took my round loaf and hollowed it out leaving a 1-inch thick shell.  In the future, I'll make that only about 3/4 of a inch thick, because there was a little too much bread in the bites we took at the edge of each wedge.


Next I brushed on a little olive oil.  The pink in the photo is because I started to add the veggies before taking the picture and removed them to do so for you.  The oil helps prevent the bread from getting soggy from the veggies if the sandwich is being served later in the day.


The first layer is the vegetable mixture (left), followed by one of the deli meats (right).  I chose to use turkey here.

 This is followed by another deli meat of your choice (left).  I used ham, but next time I think I'll use a dry salami.  That is followed by cheese (right).  With the cheese, I felt I was trying to put a square peg in a round hole!  I used sharp cheddar.


Another layer of cheese is next (left), in this case, I used mozarella.  Then I repeated the meat and cheese layers.  The final layer is the other half of the vegetable mixture (right).


The lid gets put back on and at this point, it's either ready to serve, or you wrap it up tightly in plastic wrap and either refrigerate it or put it in a cooler for your picnic. 


The original recipe called for compressing it by putting soda cans on top of it in your cooler.  I can see why that was suggested because this was a mighty tall sandwich to get my mouth around!  You can use any round loaf of your choice for this recipe.  I don't remember what kind of bread I used, but the next time I would make a point of using a Sheepherders bread, because it is a softer bread which I think would work best for a sandwich.  I don't know how it would hold up to be eaten later at a picnic!  I'll have to give it a try.  Enjoy!

The Perfect Picnic Sandwich

1 round loaf of bread
5 seeded, chopped Roma tomatoes
1/3 cup each red, yellow and orange bell peppers (or 1 cup of one color)
1/4 cup red onion, diced
2 garlic cloves, minced
1/2 cup chopped fresh basil
2 tsp. balsamic or red wine vinegar
Olive oil
2 types of deli meats of your choice
2 types of sliced cheese of your choice

In a medium bowl, mix together the tomatoes, bell peppers, onion, garlic, basil and vinegar.  Cut off top of loaf and scoop out inside of loaf leaving 3/4-inch shell.  Discard removed bread or save for another use.  Brush inside of bread shell with olive oil.  Spoon in 1/2 of the vegetable mixture into the bottom, spreading evenly.  Add one layer of each of the meats followed by one layer of each of the cheeses. Repeat the layers of meats and cheeses.  Top with the remaining 1/2 of the vegetable mixture.  Replace the lid.  Wrap tightly in plastic wrap.  Compress while refrigerating or while in cooler using heavy objects on top.